1. 简介
为高度定制化而生的论坛, 内置了异常强大的功能, 使用主流Java web开发框架(SpringBoot)开发, 更方便你进行二次开发, 还在犹豫什么, 用就是了
1.1. 为什么使用它?
-
异常详细的文档
-
丰富多彩的主题
-
随心所欲的开启/关闭各种集成的服务
-
傻瓜式部署,让不懂开发的你也能搭建自己的论坛
-
强大的API接口,为学习编程的你提供服务端环境
-
更多功能,期待你去发现
1.2. 开源协议
开源协议是 GNU AGPLv3
完全免费 源代码毫不保留的全部开源,怕留后门的,可以自行查看,不过要遵守开源协议哦
1.3. 使用过程中碰到问题怎么办?
-
一定要仔细看文档,基本上能碰到的问题在文档中都能找到解决办法
-
往下翻, 仔细查看Q&A
-
去Github Issue上提问
-
QQ群 1048094312 点击链接加入群聊【朋也社区 - 问与答】
2. 快速开始
2.1. 准备环境[必须]
-
Java环境,项目是用java开发的,java运行环境是必须的,版本:jdk8
-
MySQL数据库服务,项目采用MySQL存储数据,所以MySQL是必须的,版本5.7.x
2.2. 准备环境[非必须]
-
redis
-
elasticsearch
这两个服务在下面配置中有介绍
就这两样,就可以搭建一个自己的论坛了,当然这只限于局域网内使用,如果想搭建上线,请查看下面的配置方法
2.3. 开发人员搭建
-
git clone https://github.com/atjiu/pybbs
-
使用idea打开,项目用的是idea开发的,如果你对eclipse熟悉,也是可以的
-
idea打开它会自动构建项目,构建工具是maven
-
修改配置文件
src/main/resources/application-dev.yml里的数据库相关配置 -
找到`co.yiiu.pybbs.PybbsApplication`类,直接运行main方法即可启动
-
浏览器运行
http://localhost:8080, 后台地址http://localhost:8080/adminlogin后台用户名 admin 密码 123123
如果要自己打包,可使用命令:mvn clean compile package 进行打包,不要尝试使用其它方式打包
|
2.4. 非开发人员搭建
| release里打的包可能不是最新的 |
-
首先保证你服务器上配置好了 java 环境,版本 jdk1.8 和 MySQL服务器,版本 5.7.x 其它可选环境配置参见 [网站准备工作](zh-cn/ready)
-
然后下载最新的一键启动压缩包,下载地址:https://github.com/atjiu/pybbs/releases
-
解压, 修改解压出来的文件夹里的
application-prod.yml文件,只需要修改一个地方,就是数据库的连接信息,[配置方法](zh-cn/base) -
运行压缩包里的脚本
sh start.sh -
关闭服务运行
sh shutdown.sh -
查看启动日志
tail -200f log.file -
查看服务是否启动
ps -ef|grep pybbs如果有pybbs的进程,就说明服务启动了 -
浏览器运行
http://localhost:8080, 后台地址http://localhost:8080/adminlogin后台用户名 admin 密码 123123 -
网站的其它配置,参见文档
2.5. docker运行
-
保证服务器有docker和docker-compose环境
-
git clone https://github.com/atjiu/pybbs或 下载最新版 -
cd pybbs进入项目
-
运行
docker-compose up -d命令启动容器,-d是后台运行的意思 -
浏览器运行
http://localhost:8080, 后台地址http://localhost:8080/adminlogin后台用户名 admin 密码 123123 -
关闭容器
docker-compose down -
查看日志
docker-compose logs -f server
第一次运行会比较慢,视服务器性能和网速决定
项目根目录下会生成 mysql 文件夹为数据库文件,注意谨慎操作,另外论坛启动后,用户上传的图片和系统生成的默认头像会自动同步到根目录下的 static 文件夹下
这个Dockerfile是 @zzzzbw 大佬帮忙开发的 万分感谢!!
| 自己实在部署不好,朋也也可以代劳,不过是有偿的哦 |
3. 朋也社区案例
欢迎大家提交使用pybbs部署的网站地址, 可以给我发邮件告知 py2qiuse@gmail.com
| 版本 | 域名 |
|---|---|
master |
4. 系统配置
4.1. 基本配置
这版的配置相对其它版本的配置要简单的多,唯一要配置的就是数据库相关的配置了(如果你的数据库用户名是root 密码是空的,数据库又是跟程序在一个机器上,那就不需要配置)
配置数据库连接找到配置文件修改如下配置
-
src/main/resources/application-dev.yml开发启动时的配置文件 -
src/main/resources/application-prod.yml部署时的配置文件 -
src/main/resources/application-docker.yml通过docker启动时的配置文件
datasource_driver: com.mysql.cj.jdbc.Driver
datasource_url: jdbc:mysql://localhost:3306/pybbs?useSSL=false&characterEncoding=utf8
datasource_username: root
datasource_password:
关于其它的配置,启动程序 → 访问后台 → 系统设置 如图
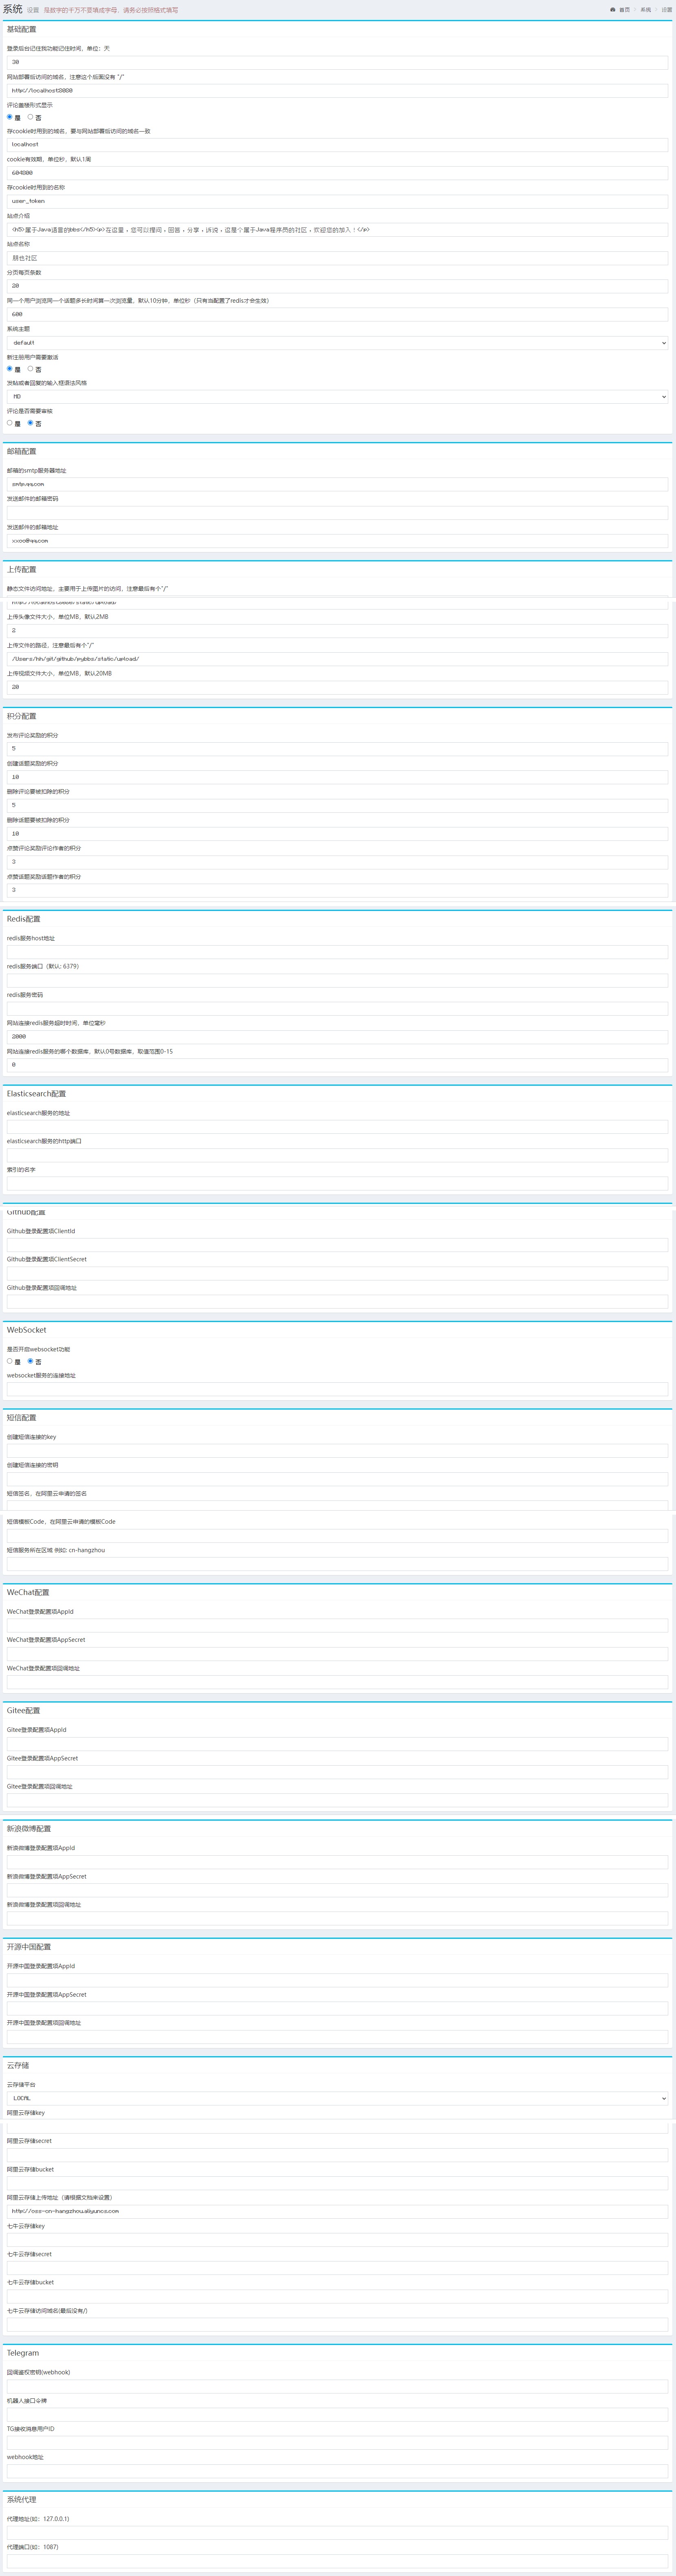
2023-03-10 新增Telegram接入收发消息功能
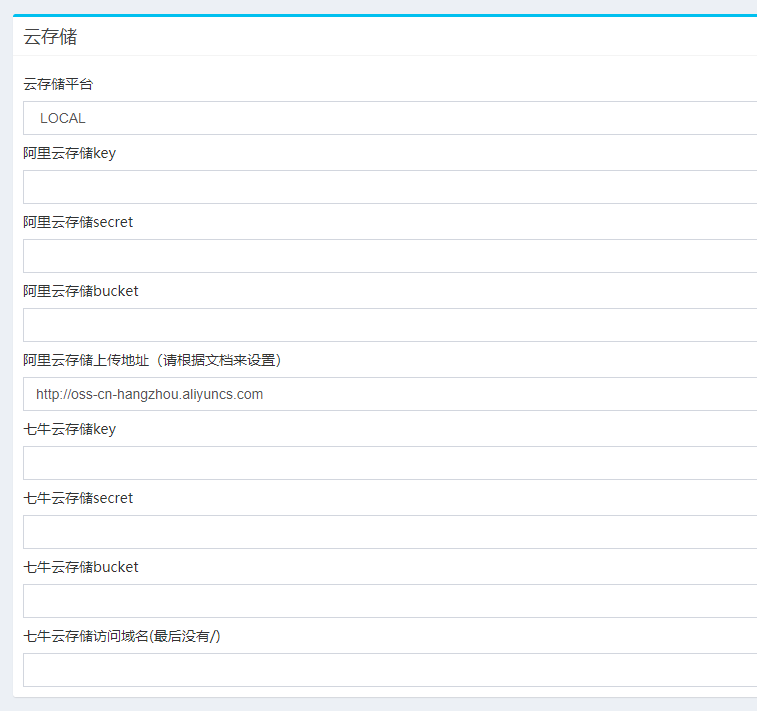
2021-03-08 新增云存储功能
有几个地方是必须要修改的,如下图中红框中的配置
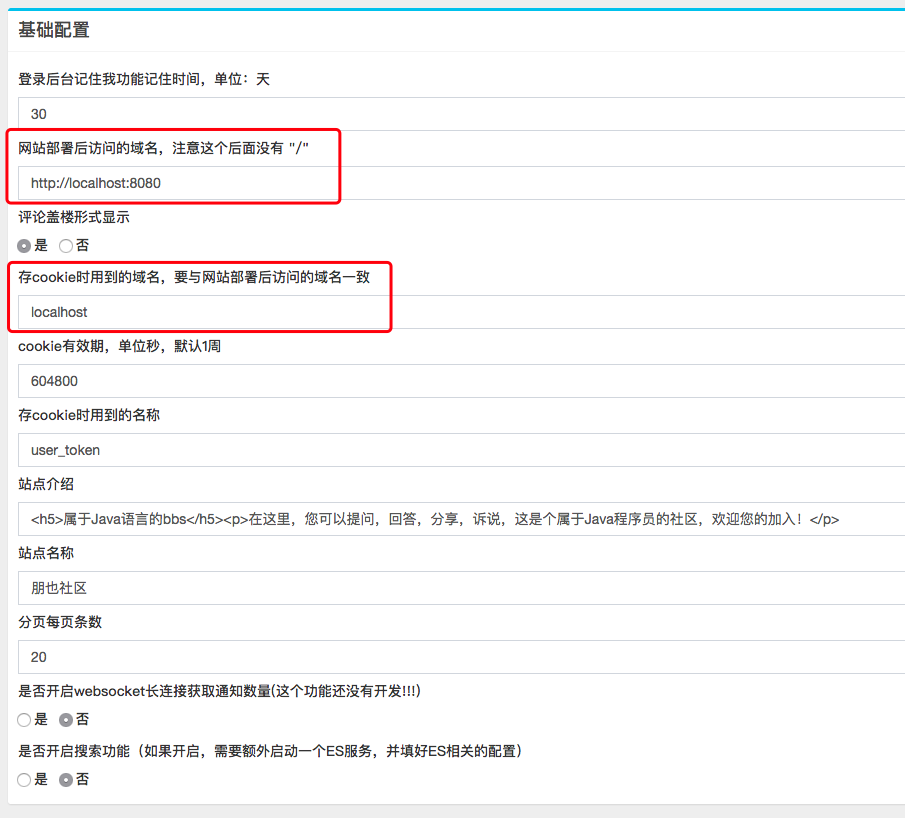
注意:
-
网站的访问域名如果为
http://example.com那么网站部署后访问的域名,注意这个后面没有 "/"这个说明下的内容就应该替换成http://example.com -
第一步配置好域名后,cookie 的域名设置也要做相应的修改,否则用户登录的记录没法保存下来,在
存cookie时用到的域名,要与网站部署后访问的域名一致这个说明下将localhost替换成example.com即可 -
除了上面两条必须要修改外,网站的上传路径也要提前做好配置,具体参见 上传配置
其它的配置根据自己环境做相应的修改即可 === 邮箱配置
用户注册没有做邮箱验证,但用户可以在自己的设置页面添加邮箱
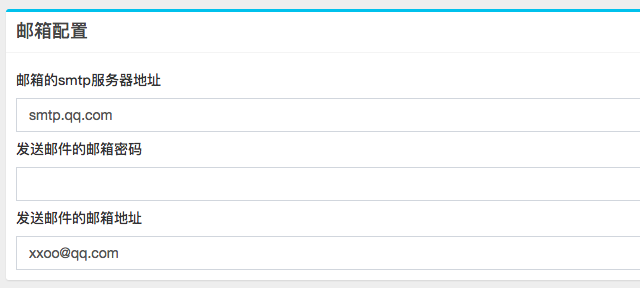
添加邮箱的时候,要发邮箱验证码,这时候就要在后台配置发邮件的邮箱配置了
我使用qq邮箱测试是没有问题的,具体配置方法,在后台已经内置了一些信息,稍做修改即可使用
| 我只测试了QQ邮箱, 配置邮箱请首先以QQ邮箱配置, 如果没有问题, 可以尝试换成其它平台的邮箱 |
发现还有好多人配不好qq的邮件,这里介绍一下qq邮件的密码获取方式
登录qq邮件 mail.qq.com ,然后打开设置 → 帐户 往下翻,找到 POP3/IMAP/SMTP/Exchange/CardDAV/CalDAV服务
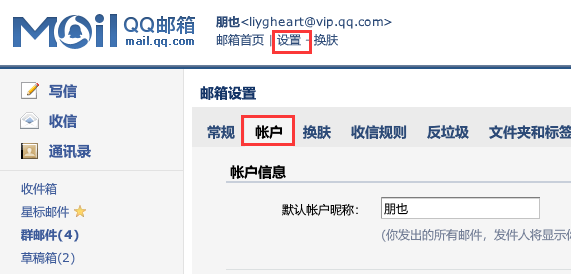
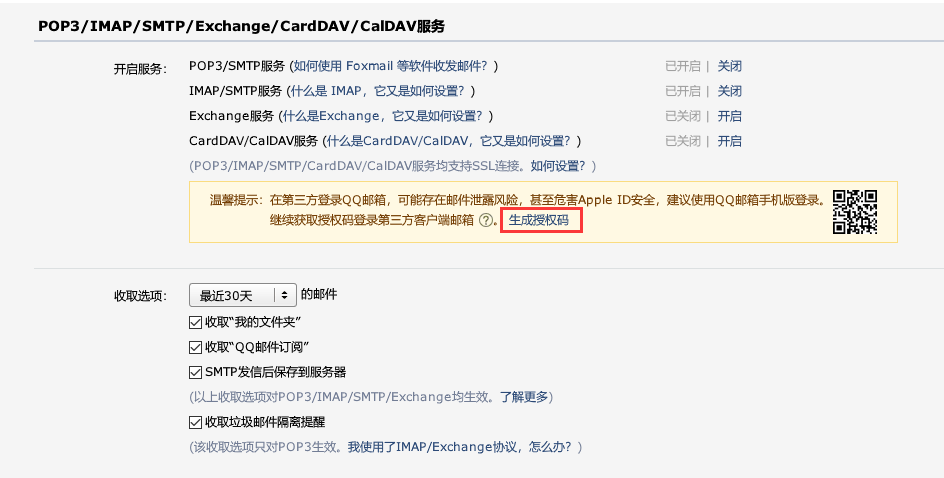
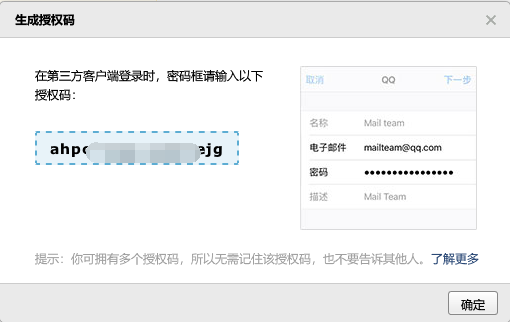
点击 生成授权码 然后用手机扫描授权(直接使用手机qq的扫描功能就可以了),成功后,会有一个授权码,这个就是邮件的密码了
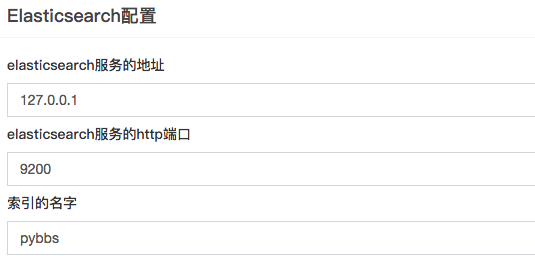
4.2. ElasticSearch配置
程序内置了elasticsearch功能,不过要增加相应的配置才能用
此功能默认是关闭的,具体的配置方法如下
-
下载elasticsearch,版本建议 6.5.3 我用的就是这个版本做的开发的
-
安装ik分词插件,如果你懂命令行操作,可以执行这条命令
cd elasticsearch-6.5.3/bin && ./elasticsearch-plugin install https://github.com/medcl/elasticsearch-analysis-ik/releases/download/v6.5.3/elasticsearch-analysis-ik-6.5.3.zip -
启动程序,进入后台,打开系统设置
-
具体操作如下图所示
打开搜索功能的开关

配置ES的连接(连接信息根据自己环境做相应的修改,不一定是图上所示的配置)
4.3. Redis配置
程序也内置了redis做缓存的功能
配置地址:启动程序 → 登录后台 → 系统设置
根据自己的环境配置上redis的信息,保存就可以用了,不用重启哦!!

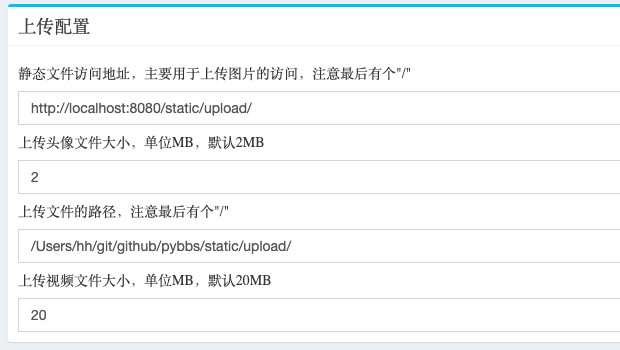
4.4. 上传配置
程序启动后,要配置上传文件保存路径,否则用户注册会看不到自己的头像
配置地址:启动程序 → 登录后台 → 系统设置
|
路径一定要是绝对路径 看到这还配置不好?请查看 非nginx静态映射配置 |
4.5. 非nginx静态映射配置
如果你没有使用nginx做静态文件映射,就请配置在程序启动目录下,举个例子:
你下载的jar包存放在 /opt/pybbs/pybbs.jar 那么这里的地址就应该是 /opt/pybbs/static/upload/
如果你用的是docker部署的服务,那这个路径配置就是固定的 /app/static 了,上传的图片会自动同步到docker启动目录下的static文件夹里
举例:
idea启动服务配置如下
-
windows: 假如项目文件夹在 D:/pybbs。那么静态文件访问地址不要变,上传文件路径修改为 D:/pybbs/static/upload/
-
macos/linux: 假如项目文件夹在 /Users/xxx/pybbs (其中xxx是你的系统用户名) 那么静态文件访问地址不要变,上传文件路径修改为 /Users/xxx/pybbs/static/upload/
jar包启动配置如下
-
windows: 假如项目文件夹在 D:/pybbs jar包在 D:/pybbs/pybbs.jar 那么静态文件访问地址不要变,上传文件路径修改为 D:/pybbs/static/upload/
-
macos/linux: 假如项目文件夹在 /Users/xxx/pybbs (其中xxx是你的系统用户名),jar包在 /Users/xxx/pybbs/pybbs.jar 那么静态文件访问地址不要变,上传文件路径修改为 /Users/xxx/pybbs/static/upload/
如果你是idea启动的话,上传完图片后,看不到图片的话,重启一下服务。
| 如果看到这还不会配置,请不要使用pybbs了,它不适合你,谢谢! |
4.6. nginx静态文件映射配置方法
nginx静态文件映射配置
server {
  #...
  location /static/ {
    root /opt/cdn/;
    autoindex on;
  }
}
那么你这个地上的配置就应该是 /opt/cdn/static/upload/
4.7. 静态文件访问地址
默认给的是 http://localhost:8080/static/upload/ 如果你的访问域名是 http://example.com 那这里就要换成 http://example.com/static/upload/
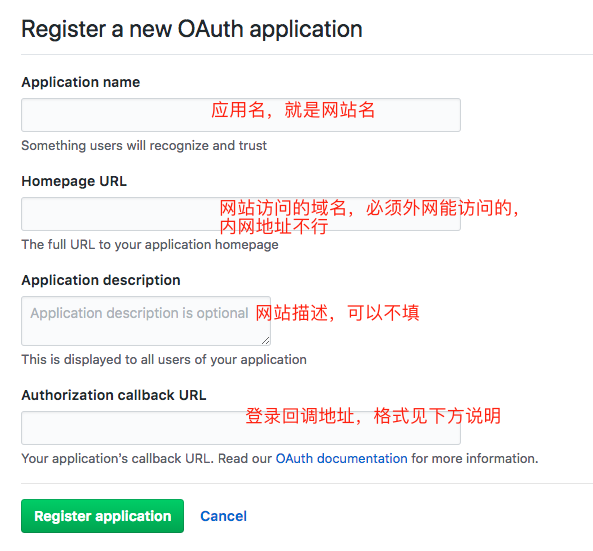
4.8. Github登录配置方法
申请clientId, clientSecret地址:https://github.com/settings/developers 前提要先登录github
打开页面后,点击 New OAuth APP 按钮

填上必要的信息
填写好之后,保存,跳转的页面上就有 clientId, clientSecret信息了,如下图

拷贝上图中红框内容,粘贴到网站后台系统设置页面里的 Github 配置信息里
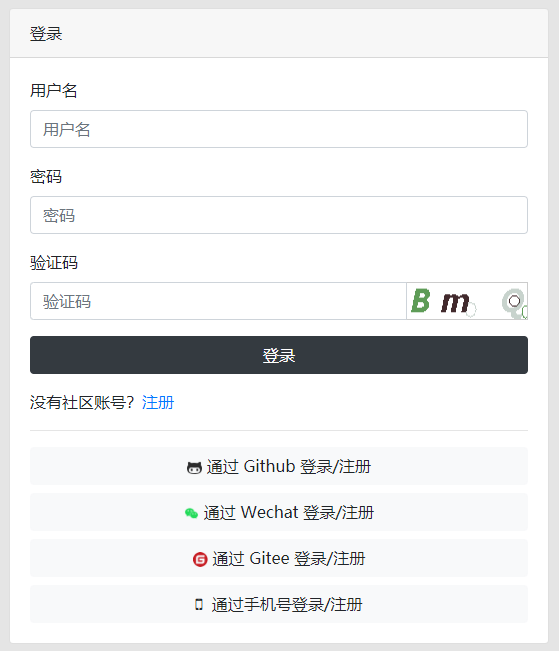
刷新登录页面即可出现相应按钮
注意
-
网站域名必须外网能访问,如是你要在内网测试,可以使用ngrok,frp等工具来做内网穿透,具体使用方法百度吧,网上很多
-
回调地址格式是 网站域名+/oauth/github/callback 假如你的域名是
http://example.com那么这里的回调地址就是http://example.com/oauth/github/callback不要填错了
配置好之后,保存,再次回到首页,就可以看到页面 header 上就有了`Github登录`的入口了
4.9. 微信登录配置方法
注册开放平台 http://open.weixin.qq.com 然后创建web应用,跟着步骤一步一步来就可以了,最后可以拿到 appid appsecret 加上在创建应用的时候填上的 callback
总共三个参数,都配置在`朋也社区`后台设置页面里`微信登录`区域,然后刷新登录页面,就有微信登录按钮了!!
感谢 @gdhua 提供的微信联合登录要用到的 appid appsecret
4.10. 短信验证码登录/注册
在群友提供的阿里云短信的key, secret及模板的帮助下,朋也社区也有了短信验证码登录的功能了,配置如下
登录 http://aliyun.com ,打开 https://dysms.console.aliyun.com/dysms.htm?spm=5176.8195934.1283918..623230c9cuQEpk#/domestic/text/sign 链接
配置 签名 模板 区域
然后在 https://usercenter.console.aliyun.com/?spm=5176.12207334.0.0.8dae1cbeSq0lnd#/manage/ak 这个页面拿到 key secret
最后配置在项目后台的系统设置里,刷新登录页面,就会有手机号登录的按钮出现
|
短信服务目前只支持阿里云短信服务 申请模板的时候,动态内容的变量名是 |
感谢 @sunkaifei 提供的阿里云短信验证码登录要用到的 key secret
4.11. 开启WebSocket
重新更新了一下websocket的实现,换成了javax.websocket包下的类实现,没有了之间的关闭服务还要等会的问题了
而且页面上也不用再多引入一个socket.io的js了,纯原生的js实现
|
注意,因为网站是服务端渲染的,所以每次请求页面都会刷新,websocket也会重连,这就有点蛋疼了 不过也不是没办法, 可以给网站加上pjax支持,也可以将这个功能用在纯js渲染的网站上,很显然这两个功能pybbs都还没有 |
目前围绕ws开发的功能有如下
-
自己的话题被收藏了,会收到通知
-
自己的话题被评论了,会收到通知
-
自己的评论被回复了,会收到通知
-
进入页面后,ws会自动获取未读消息数,然后展示在页面上的Header和`document.title`上
效果如下
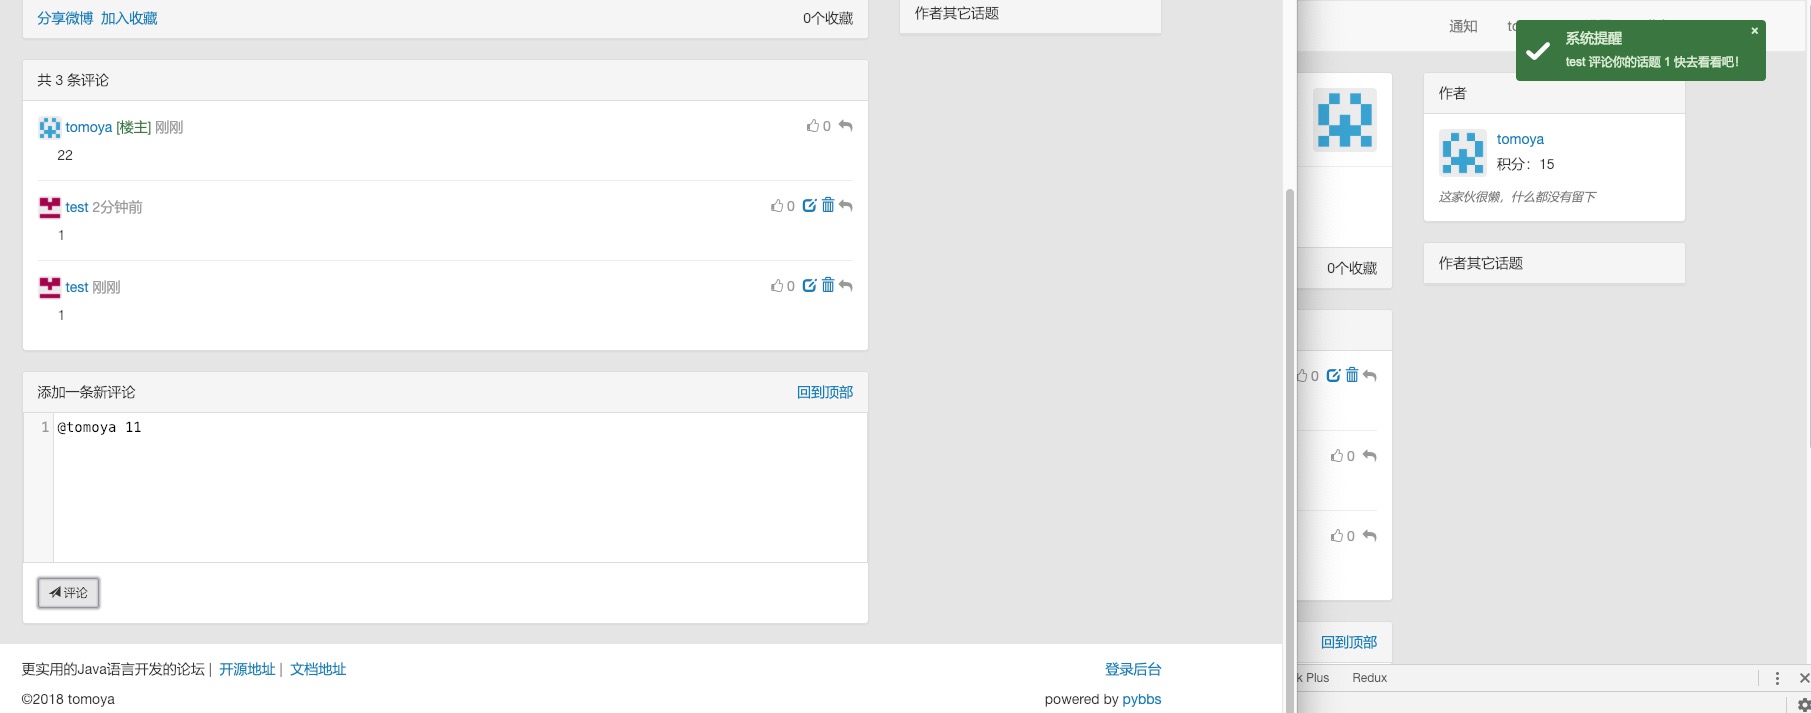
当然开启websocket服务也不是没有好处的,比如:
-
上图中别人回复了自己的评论就会立即收到消息
-
发一个帖子等着别人回复,不用一直刷新页面看有没有新消息了
如果你看了上面的说明后,还是想开启,配置如下
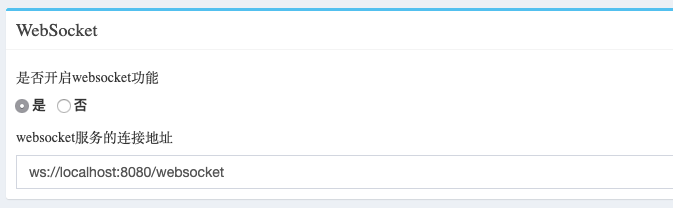
只有两个配置
-
开启功能,不多说
-
ws连接地址,协议是
ws或者wss(如果你网站访问用的是https,那这个就应该是wss),其它跟上面配置的网站访问域名一样
然后直接启动系统即可,注意,ws服务在前端只有登录后的用户才有效
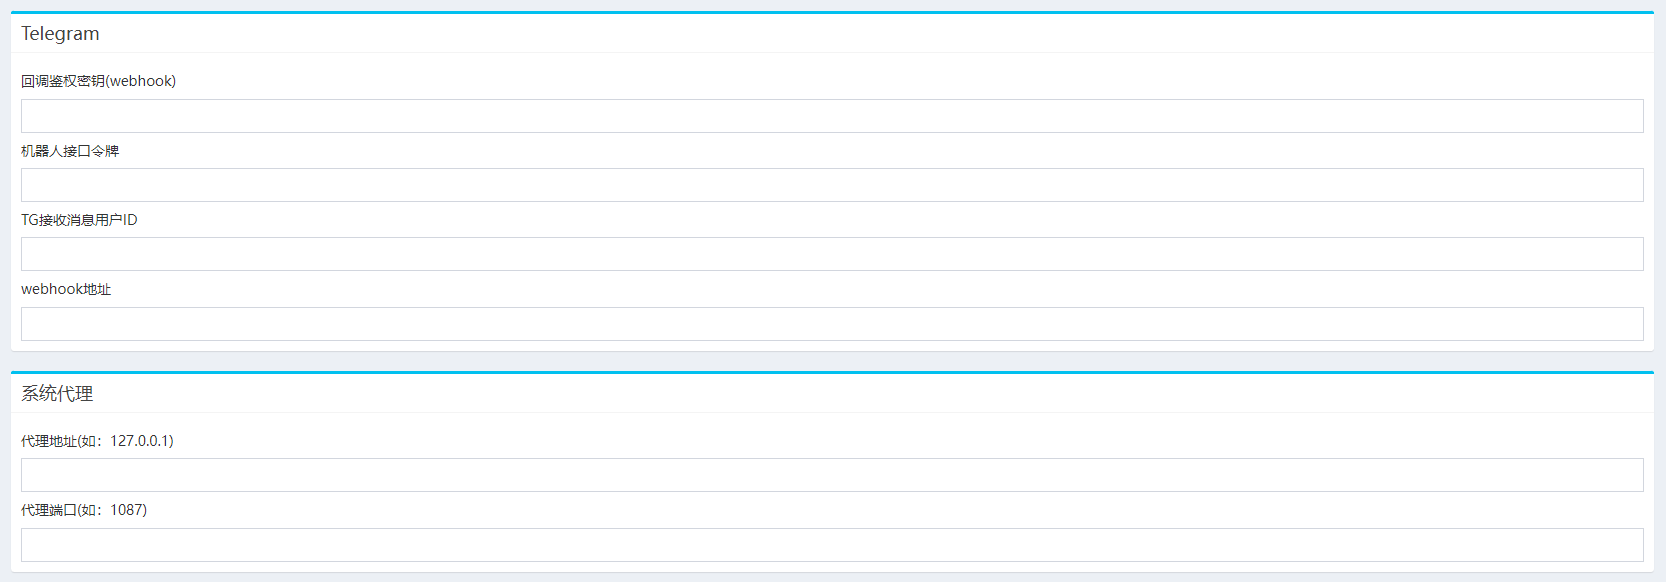
4.12. Telegram配置
这个功能目前主要是为了方便站长管理论坛的,接入tg后,当论坛内有新的评论会第一时间推送到tg上,站长可在tg上进行审核与删除的操作
因为tg在国内是被墙的状态,但它的api确实好用,所以就需要额外加一个配置项代理
代理怎么配置?这个会的就不多说了,不会的就跳过这个功能吧!
tg那几项怎么配置?参见这篇博客 https://atjiu.github.io/2023/03/09/telegram-bot-api/
配置好之后的使用效果如下视频(如果在网页上看不到画面,可将其下载到本地打开观看)
4.13. 内置主题
-
default: 默认主题(使用Bootstrap3开发的)
-
simple: 黑白简洁主题(仿hacker news开发的, 有时候看着也挺像kindle风格的)
4.14. 更换主题
启动后,登录后台,可进行选择使用哪套,选择后保存,立即生效

想体验的,可以在体验环境上修改查看
关于主题怎么开发,下一篇介绍
5. 公网部署
5.1. 部署步骤
-
购买域名,域名提供商非常多,选一个自己喜欢的购买一个就可以了
-
去服务器运营商购买服务器,建议阿里云,购买的时候看清区域,国内做论坛 必须要备案的 ,不过阿里云也有国外的节点,购买的时候请注意
-
安装java8,mysql5.7
-
按照 快速开始 中的部署方法部署
5.2. nginx配置
如果你服务器上就只一个论坛项目,那直接将程序里的端口改成80即可,如果你还想折腾点其它的东西,那就要用到nginx做代理转发请求了,具体配置如下
假如 example.com 是你的域名,程序启动端口是 8080 ,配置如下
server {
  server_name example.com;
  location / {
    proxy_pass http://127.0.0.1:8080/;
    proxy_redirect          off;
    proxy_set_header        Host            $host;
    proxy_set_header        X-Real-IP       $remote_addr;
    proxy_set_header        X-Forwarded-For $proxy_add_x_forwarded_for;
    client_max_body_size    2m;
    client_body_buffer_size 128k;
    proxy_connect_timeout   300;
    proxy_send_timeout      300;
    proxy_read_timeout      300;
    proxy_buffers           32 32k;
    proxy_buffer_size       64k;
    proxy_busy_buffers_size 128k;
  }
}
5.3. frp映射配置
关于这个配置可以参见我的一篇博客 利用frp内网穿透实现用自家电脑发布网站(不用买服务器了)
5.4. 配置https
https强烈推荐使用 letsencrypt 配置简单,主要是免费,唯一的缺点就是要3个月续一下时间,配置参见文档: letsencrypt结合nginx配置https备忘
配置外网环境运气好,很快就可以搭建好,运气不好,折腾两天是常事,淡定慢慢配
| 自己实在部署不好,朋也也可以代劳,不过是有偿的哦 |
6. 主题开发
开发主题,首先要会使用freemarker模板引擎, 因为pybbs的页面用的就是freemarker模式
必要说明:
-
主题开发好了,需要放在
src/main/resources/templates/theme下,系统启动会自动读取主题目录,然后在后台就可以选择你想要的主题了 -
如果你不是开发环境,那需要将开发好的或者下载的主题文件夹放在
pybbs.jar所在目录下的templates/theme文件夹下,如果这两个文件夹没有,需要你创建好 -
开发主题肯定需要引入样式,建议使用
cdnjs.com的外链,但也有一些对系统内的样式,这个样式文件需要放在pybbs.jar目录所在文件夹下的templates/static/theme/css文件夹下,js同理
6.1. 主题目录
主题必备目录有以下几个
simple
├── comment
├── tag
├── topic
└── user
必备的文件有如下
simple
├── comment
│   └── edit.ftl
├── error.ftl
├── index.ftl
├── login.ftl
├── notifications.ftl
├── register.ftl
├── search.ftl
├── tag
│   ├── tag.ftl
│   └── tags.ftl
├── top100.ftl
├── topic
│   ├── create.ftl
│   ├── detail.ftl
│   └── edit.ftl
└── user
    ├── collects.ftl
    ├── comments.ftl
    ├── profile.ftl
    ├── settings.ftl
    └── topics.ftl
注意,上面列出来的文件夹和文件都是必备的
如果你习惯封装,可以跟default主题里一样,把通用的代码块封装成component,放在一个文件夹里(比如 default主题里的组件文件夹就是 components 当然这个不是必须的)
6.2. 全局对象
通俗点说就是在所有页面里都能取到的数据的对象,有如下几个
| 对象名 | 描述 |
|---|---|
model |
这个对象就是项目中类 BaseModel 的对象,所以使用这个对象可以调用BaseModel类中的所有方法 |
_user |
这个对象是用户在登录或者注册成功后,将当前用户的对象存放在Session中的对象,只有在用户登录后才能获取到 |
site |
这个对象就是后台系统配置中的那一堆东西 |
i18n |
如果开发主题里要适配上国际化,可以使用这个对象来获取一些国际化菜单的不同语言的不同值 |
6.2.1. model对象内的方法
String formatDate(Date date);
String formatContent(String content);
Set<String> getUpIds(String upIds);
boolean isEmpty(String txt);
6.2.2. site对象中的属性
在页面里取site里的属性方法 ${site.name!}
属性的类型全都是 String,可根据自己需要将值转成 int 或者 boolean
| 属性 | 描述 |
|---|---|
admin_remember_me_max_age |
登录后台记住我功能记住时间,单位:天 |
base_url |
网站部署后访问的域名,注意这个后面没有 "/" |
comment_layer |
评论盖楼形式显示 |
cookie_domain |
存cookie时用到的域名,要与网站部署后访问的域名一致 |
cookie_max_age |
cookie有效期,单位秒,默认1周 |
cookie_name |
存cookie时用到的名称 |
create_comment_score |
发布评论奖励的积分 |
create_topic_score |
创建话题奖励的积分 |
delete_comment_score |
删除评论要被扣除的积分 |
delete_topic_score |
删除话题要被扣除的积分 |
intro |
站点介绍 |
mail_host |
邮箱的smtp服务器地址 |
mail_username |
发送邮件的邮箱地址 |
name |
站点名称 |
page_size |
分页每页条数 |
websocket |
是否开启websocket功能 |
static_url |
静态文件访问地址,主要用于上传图片的访问,注意最后有个"/" |
up_comment_score |
点赞评论奖励评论作者的积分 |
upload_image_size_limit |
上传头像文件大小,单位MB,默认2MB |
upload_path |
上传文件的路径,注意最后有个"/" |
up_topic_score |
点赞话题奖励话题作者的积分 |
redis_host |
redis服务host地址 |
redis_port |
redis服务端口(默认: 6379) |
redis_timeout |
网站连接redis服务超时时间,单位毫秒 |
redis_database |
网站连接redis服务的哪个数据库,默认0号数据库,取值范围0-15 |
elasticsearch_host |
elasticsearch服务的地址 |
elasticsearch_port |
elasticsearch服务的http端口 |
elasticsearch_index |
索引的名字 |
oauth_github_client_id |
Github登录配置项ClientId |
oauth_github_callback_url |
Github登录配置项回调地址 |
topic_view_increase_interval |
同一个用户浏览同一个话题多长时间算一次浏览量,默认10分钟,单位秒(只有当配置了redis才会生效) |
websocket_url |
websocket服务的连接地址 |
theme |
系统主题 |
sms_access_key_id |
创建短信连接的key |
sms_sign_name |
短信签名,在阿里云申请的签名 |
sms_template_code |
短信模板Code,在阿里云申请的模板Code |
oauth_wechat_client_id |
WeChat登录配置项AppId |
oauth_wechat_callback_url |
WeChat登录配置项回调地址 |
sms_region_id |
短信服务所在区域 例如: cn-hangzhou |
upload_video_size_limit |
上传视频文件大小,单位MB,默认20MB |
oauth_gitee_client_id |
Gitee登录配置项AppId |
oauth_gitee_callback_url |
Gitee登录配置项回调地址 |
oauth_weibo_client_id |
新浪微博登录配置项AppId |
oauth_weibo_callback_url |
新浪微博登录配置项回调地址 |
oauth_oschina_client_id |
开源中国登录配置项AppId |
oauth_oschina_callback_url |
开源中国登录配置项回调地址 |
user_need_active |
新注册用户需要激活 |
content_style |
发帖或者回复的输入框语法风格 |
cloud_storage_platform |
云存储平台 |
oss_key |
阿里云存储key |
oss_secret |
阿里云存储secret |
oss_bucket |
阿里云存储bucket |
oss_end_point |
阿里云存储上传地址(请根据文档来设置) |
qiniu_key |
七牛云存储key |
qiniu_secret |
七牛云存储secret |
qiniu_bucket |
七牛云存储bucket |
qiniu_domain |
七牛云存储访问域名(最后没有/) |
tg_to_chat_id |
TG接收消息用户ID |
comment_need_examine |
评论是否需要审核 |
http_proxy |
代理地址(如:127.0.0.1) |
http_proxy_port |
代理端口(如:1087) |
6.2.3. i18n对象中的属性
在页面中获取的方法是 ${i18n.getMessage("index")}
| 属性 | 描述 |
|---|---|
index |
首页 |
tag |
标签 |
search |
搜索 |
login |
登录 |
github_login |
Github登录 |
register |
注册 |
notification |
通知 |
setting |
设置 |
logout |
登出 |
welcome |
欢迎您 |
admin.dashboard |
仪表盘 |
admin.topics |
话题列表 |
admin.comments |
评论列表 |
admin.tags |
标签列表 |
admin.users |
用户列表 |
admin.permission_config |
权限中心 |
admin.admin_users |
后台用户列表 |
admin.roles |
角色列表 |
admin.permissions |
权限列表 |
admin.system_config |
系统设置 |
6.3. Freemarker自定义标签
pybbs提供了如下几个自定义标签
| 标签名 | 描述 | 参数 | 返回的对象(类型) |
|---|---|---|---|
tag_topics |
话题列表 |
pageNo, tab |
page(Page<Map<String, Object>>) |
tag_other_topic |
作者其它话题 |
userId, topicId, limit |
topics(List<Topic>) |
tag_notifications |
通知列表 |
userId, read, limit |
notifications(List<Map<String, Object>>) |
tag_score |
积分排行 |
limit |
users(List<User>) |
tag_search |
搜索结果列表 |
keyword, pageNo |
page(Page<Map<String, Object>>) |
tag_tags |
标签列表 |
pageNo, pageSize |
page(Page<Tag>) |
tag_user_topics |
用户的话题列表 |
username, pageNo, pageSize |
topics(Page<Map<String, Object>>) |
tag_user_comments |
用户的评论列表 |
username, pageNo, pageSize |
comments(Page<Map<String, Object>>) |
tag_user_collects |
用户的收藏列表 |
username, pageNo, pageSize |
collects(Page<Map<String, Object>>) |
tag_topic_comments |
话题的评论列表 |
topicId |
comments(List<CommentsByTopic>) |
在标签返回对象里有一些不是定义的model里的对象,而是Map封装的对象,这些map里都有啥呢?
6.3.1. 标签 tag_topics 对象中的Map包含的字段
-
Topic t.*: Topic对象里的所有字段
-
username: 用户名
-
avatar: 用户头像
6.3.2. 标签 tag_notifications 对象中的Map包含的字段
-
Notification n.*: Notification对象里的所有字段
-
username: 用户名
-
avatar: 用户头像
-
title: 话题标题
-
topicId: 话题ID
6.3.3. 标签 tag_search 对象中的Map包含的字段
-
id: 话题ID
-
title: 话题标题
-
content: 话题内容
6.3.4. 标签 tag_user_topics 对象中的Map包含的字段
-
Topic t.*: Topic对象里的所有字段
-
username: 用户名
-
avatar: 用户头像
6.3.5. 标签 tag_user_comments 对象中的Map包含的字段
-
Comment c.*: Comment对象里的所有字段
-
topicUsername: 话题的用户名
-
commentUsername: 话题的用户名
-
title: 话题标题
-
topicId: 话题ID
6.3.6. 标签 tag_user_collects 对象中的Map包含的字段
-
Topic t.*: Topic对象里的所有字段
-
username: 用户名
-
avatar: 用户头像
6.4. 自定义标签使用
自定义标签用法很简单,不会用的话,可以参考已经存在的主题里的用法,下面说一下首页的 tag_topics 标签的用法
<@tag_topics pageNo=pageNo tab=tab>
  // tag_topics 里的两个参数都是从controller里传过来的
  // 在标签内部就可以拿到自定义标签返回的对象了,比如这个标签返回的就一个page对象
  <#list page.records as topic>
    <p>${topic.title}</p>
  </#list>
</@tag_topics>
至于标签里返回的对象都是什么东西,下面介绍,先说说每个路由渲染的页面里都能取出什么东西吧
6.5. 路由渲染可获取对象
| 地址 | 类名 | 参数 | 放在model中对象 | 渲染视图文件名 |
|---|---|---|---|---|
/ |
IndexController |
tab, pageNo |
tab, active, pageNo |
index.ftl |
/top100 |
IndexController |
top100.ftl |
||
/settings |
IndexController |
user |
user/settings.ftl |
|
/tags |
IndexController |
pageNo |
pageNo |
tag/tags.ftl |
/login |
IndexController |
login.ftl |
||
/register |
IndexController |
register.ftl |
||
/notifications |
IndexController |
notifications.ftl |
||
/logout |
IndexController |
重定向到首页 |
||
/search |
IndexController |
pageNo, keyword |
pageNo, keyword |
search.ftl |
/changeLanguage |
IndexController |
lang: zh, cn |
重定向到之前页面首页 |
|
/active |
IndexController |
email, code |
激活成功后重定向到 |
|
/user/{username} |
UserController |
username |
githubLogin, user, username, oAuthUsers, collectCount |
user/profile.ftl |
/user/{username}/topics |
UserController |
username, pageNo |
username, pageNo |
user/topics.ftl |
/user/{username}/comments |
UserController |
username, pageNo |
username, pageNo |
user/comments.ftl |
/user/{username}/collects |
UserController |
username, pageNo |
username, pageNo |
user/collects.ftl |
/topic/{id} |
TopicController |
id |
collect, topic, tags, topicUser, collects |
topic/detail.ftl |
/topic/create |
TopicController |
tag |
tag |
topic/create.ftl |
/topic/edit/{id} |
TopicController |
id |
topic, tags |
topic/edit.ftl |
/topic/tag/{name} |
TopicController |
name |
tag, page |
tag/tag.ftl |
/comment/edit/{id} |
CommentController |
id |
comment, topic |
comment/edit.ftl |
/common/captcha |
CommonController |
响应的是一张图片验证码的流 |
||
/oauth/redirect/{platform} |
OAuthController |
重定向到指定的平台授权页面,授权完成自动回调。目前支持的平台有:github、gitee、weibo、oschina和wechat |
6.6. 对象包含的字段
6.6.1. 分页对象 Page
这个对象是Mybatis-Plus里封装的,常用字段有以下几个
-
List records: 查询出来的列表放在这个里面,类型是个List
-
long current: 当前是第几页,从1开始
-
long total: 总条数
-
long pages: 总页数
-
long size: 每页显示条数
6.6.2. 用户对象 User
private Integer id;
private String username;
private String telegramName;
private String avatar;
private String password;
private String email;
// 个人网站
private String website;
// 个人简介
private String bio;
private Integer score;
private Date inTime;
private String token;
// 有消息通知是否通过邮箱收取
private Boolean emailNotification;
// 帐号的激活状态
private Boolean active;
6.6.3. 话题对象 Topic
private Integer id;
private String title;
private String content;
private Date inTime;
private Date modifyTime;
private Integer userId;
// 评论数
private Integer commentCount;
// 收藏数
private Integer collectCount;
// 浏览数
private Integer view;
// 置顶
private Boolean top;
// 加精
private Boolean good;
// 点赞用户的id英文,隔开的,要计算被多少人点赞过,可以通过英文,分隔这个字符串计算数量
private String upIds;
6.6.4. 评论对象 Comment
private Integer id;
private Integer topicId;
private Integer userId;
private String content;
private Date inTime;
private Integer commentId;
// 点赞用户的id
private String upIds;
6.6.5. 评论(盖楼)对象 CommentsByTopic
// 话题下面的评论列表单个对象的数据结构
public class CommentsByTopic extends Comment implements Serializable {

  private String username;
  private String avatar;
  // 评论的层级,直接评论话题的,layer即为0,如果回复了评论的,则当前回复的layer为评论对象的layer+1
  private Integer layer;
}
6.6.6. 通知对象 Notification
private Integer id;
private Integer topicId;
private Integer userId;
// 通知对象ID
private Integer targetUserId;
// 动作: REPLY, COMMENT, COLLECT, TOPIC_UP, COMMENT_UP
private String action;
private Date inTime;
private String content;
// 是否已读
private Boolean read;
6.6.7. 授权登录对象 OAuthUser
private Integer id;
// oauth帐号的id
private Integer oauthId;
// 帐号类型,GITHUB, QQ, WECHAT, WEIBO 等
private String type;
// oauth帐号的登录名
private String login;
private String accessToken;
private Date inTime;
// 个人简介
private String bio;
private String email;
// 本地用户的id
private Integer userId;
7. 接口文档
7.1. 获取token
系统默认开启了cors访问,任何源都可以访问 /api/* 下的资源,如果想关闭的话,可以通过修改源码的方式关闭,源码位置 co.yiiu.pybbs.config.WebMvcConfig*
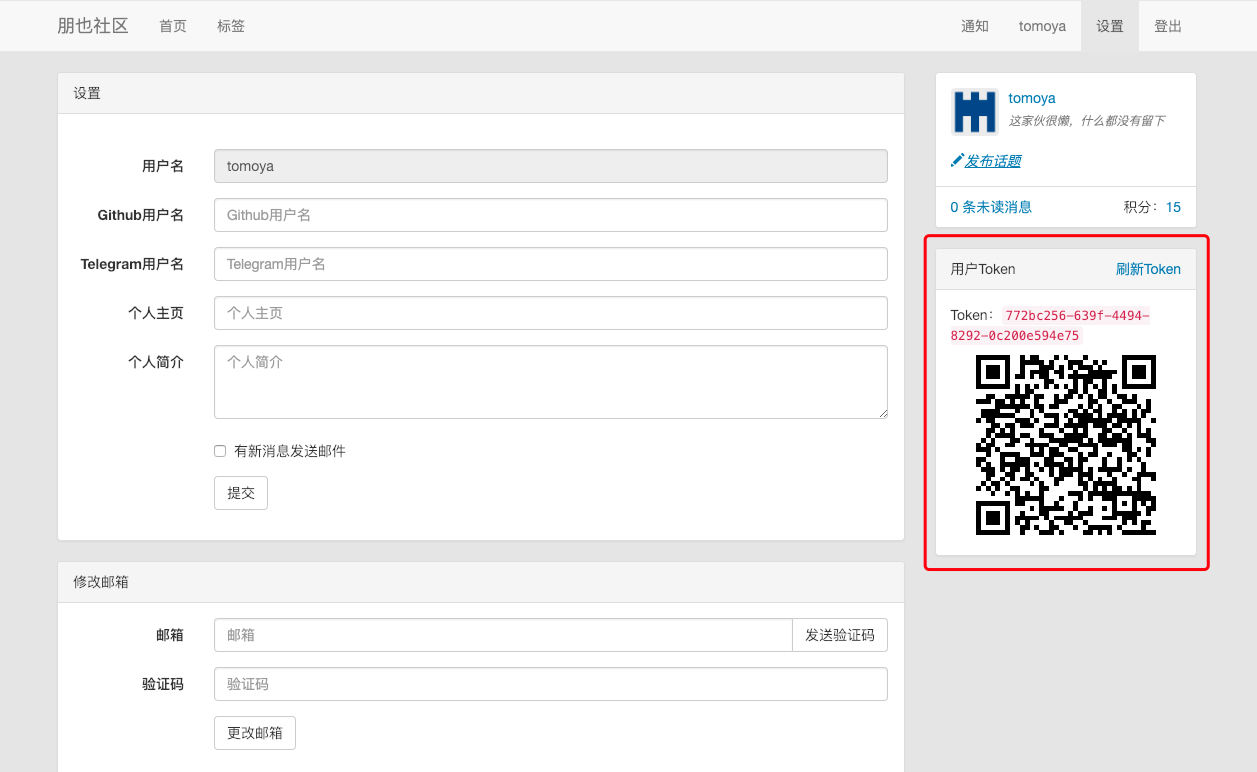
有的接口请求要求带上用户的`token`参数,这个token是在用户注册的时候自动生成的,可以在个人设置页面重新生成
token的获取方式:
用户登录上论坛,打开页面最上方的 设置,在页面右边可以查看到自己的token,如下图
7.2. 请求接口示例
pybbs上的接口风格已经全都换成`RESTFUL`风格的了,调用方式也有了相应的调整
-
所有需要传token的接口,token参数要放在请求头里(headers)
-
所有需要传参数的接口,参数都以 json 的形式传递
-
请求不单单是get, post了,还加入了put, delete,请仔细查看接口文档
下面给一个发帖的jQuery调用示例:
$.ajax({
  url: '/api/topic',
  type: 'post',
  cache: false,
  async: false,
  headers: {
    'token': '8f2e6b0d-5a7a-44eb-9c96-4f87d55c212e'
  },
  contentType: 'application/json',
  data: JSON.stringify({
    title: title,
    content: content,
    tags: tags,
  }),
  success: function(data) {
    if (data.code === 200) {
      window.location.href = "/topic/" + data.detail.id
    } else {
      alert(data.description);
    }
  }
})
7.3. 接口返回对象
接口返回对象就只有一个 Result
这个类是在程序里自定义的,共三个属性
public class Result {

  private Integer code;
  private String description;
  private Object detail;

  // getter, setter
}-
code : 返回时的状态值,成功:200, 失败:201
-
description: 失败时的一些描述信息放在这个属性里
-
detail: 一般放成功后的返回值,它是一个Object类型的属性,可以放任何对象
7.4. 接口返回分页对象
如果接口涉及到分页的话,就会返回 Result(IPage) 就是将查询后封装好的分页对象放在Result对象的detail属性里,再转成json返给前端
IPage对象是MyBatis-Plus内置的一个分页对象,其中调用接口可能会用到的属性有如下几个
-
records: 查询出的列表对象
-
pages: 分页后的总页数
-
total: 总条数
-
current: 当前页数
-
size: 每页条数
遗憾的是它没有像jpa那样封装两个属性 last next 这样就可以直接拿它们的值来判断是不是第一页或最后一页了
不过也可以通过 current 和 pages 来判断是第一页还是最后一页
7.5. 图片验证码
-
地址 POST
/common/captcha -
参数
-
无
-
-
返回 GIF图片
响应是一张GIF动态图片,如下图

首页接口分别有以下几个
7.6. 首页 - 首页列表
-
地址 GET
/api/或者/api/index -
请求类型 application/x-www-form-urlencoded
-
参数
-
pageNo: 页码
-
tab: 分类,分别是 精华:
good无人评论:noanswer热门:hot最新:newest
-
-
返回 Result(IPage<Map>)
{
"code":200,
"description":"SUCCESS",
"detail":{
"records":[
{
"collectCount":0,
"avatar":"http://localhost:8080/static/upload/avatar/tomoya/avatar.png",
"title":"我是一个话题标题",
"userId":1,
"good":false,
"content":"我是话题内容\n\n我还支持Markdown语法哦\n\n\n\n- 无序列表1\n- 无序列表2\n- 无序列表3\n\n1. 有序列表1\n2. 有序列表2\n3. 有序列表3\n\n| Column A | Column B | Column C |\n| -------- | -------- | -------- |\n| A1 | B1 | C1 |\n| A2 | B2 | C2 |\n| A3 | B3 | C3 |\n\n[开发俱乐部](https://17dev.club/)",
"commentCount":0,
"tags":[
{
"id":1,
"name":"一个标签",
"description":null,
"icon":null,
"topicCount":1,
"inTime":1548992281000
}
],
"inTime":1548992281000,
"view":2,
"modifyTime":1548992296000,
"top":false,
"id":1,
"username":"tomoya"
}
],
"total":1,
"size":20,
"current":1,
"searchCount":true,
"pages":1
}
}7.7. 首页 - 登录
-
地址 POST
/api/login -
请求类型 application/json
-
参数
-
username: 用户名
-
password: 密码
-
captcha: 图片验证码
-
-
返回 Result(Map)
{
  "code": 200,
  "description": "SUCCESS",
  "detail": {
    "user": {
      "id": 1,
      "username": "tomoya",
      "telegramName": null,
      "avatar": "http://localhost:8080/static/upload/avatar/tomoya/avatar.png",
      "email": null,
      "website": null,
      "bio": null,
      "score": 10,
      "inTime": 1548992041000,
      "emailNotification": false
    },
    "token": "208bb4c1-daf1-4a32-b198-7f4db8f6d565"
  }
}
7.8. 首页 - 注册
-
地址 POST
/api/register -
请求类型 application/json
-
参数
-
username: 用户名
-
password: 密码
-
email: 邮箱地址
-
captcha: 图片验证码
-
-
返回 Result(Map)
{
  "code": 200,
  "description": "SUCCESS",
  "detail": {
    "user": {
      "id": 2,
      "username": "test",
      "telegramName": null,
      "avatar": "http://localhost:8080/static/upload/avatar/test/avatar.png",
      "email": null,
      "website": null,
      "bio": null,
      "score": 0,
      "inTime": 1548992486000,
      "emailNotification": false
    },
    "token": "b7ee4a41-48d9-4185-9ab7-bcd202719ded"
  }
}
7.9. 首页 - 发送手机验证码
-
地址 GET
/api/send_code -
请求类型 application/x-www-form-urlencoded
-
参数
-
mobile: 手机号
-
captcha: 图片验证码
-
-
返回 Result(Map)
{
  "code": 200,
  "description": "SUCCESS",
  "detail": null
}
7.10. 首页 - 手机号+验证码登录/注册
-
地址 POST
/api/mobile_login -
请求类型 application/json
-
参数
-
mobile: 手机号
-
code: 手机验证码
-
captcha: 图片验证码
-
-
返回 Result(Map)
{
  "code": 200,
  "description": "SUCCESS",
  "detail": {
    "user": {
      "id": 2,
      "username": "test",
      "telegramName": null,
      "avatar": "http://localhost:8080/static/upload/avatar/test/avatar.png",
      "email": null,
      "mobile": "13111111111",
      "website": null,
      "bio": null,
      "score": 0,
      "inTime": 1548992486000,
      "emailNotification": false
    },
    "token": "b7ee4a41-48d9-4185-9ab7-bcd202719ded"
  }
}
7.11. 首页 - 标签
-
地址 POST
/api/tags -
请求类型 application/x-www-form-urlencoded
-
参数
-
pageNo
-
-
返回 Result(List<Tag>)
{
  "code": 200,
  "description": "SUCCESS",
  "detail": {
    "records": [
      {
        "id": 1,
        "name": "一个标签",
        "description": "标签描述,解释一下标签让人能更明白它的意思",
        "icon": "http://spring.io/img/homepage/icon-spring-boot.svg",
        "topicCount": 1,
        "inTime": 1548992281000
      }
    ],
    "total": 1,
    "size": 20,
    "current": 1,
    "searchCount": true,
    "pages": 1
  }
}
7.12. 首页 - 标签查话题列表
-
地址 POST
/api/tag/:name -
请求类型 application/x-www-form-urlencoded
-
参数
-
pageNo
-
name 标签名
-
-
返回 Result(IPage<Map>)
{
  "code": 200,
  "description": "SUCCESS",
  "detail": {
    "tag": {
      "id": 17,
      "name": "朋也社区",
      "description": null,
      "icon": null,
      "topicCount": 3,
      "inTime": 1551036349000
    },
    "page": {
      "records": [
        {
          "collectCount": 1,
          "avatar": "https://avatars3.githubusercontent.com/u/6915570?s=460&v=4",
          "title": "网站的接口全换成restful风格的了,欢迎大家来测bug",
          "userId": 1,
          "good": false,
          "content": "",
          "commentCount": 1,
          "inTime": 1551036349000,
          "view": 236,
          "modifyTime": 1555529685000,
          "top": false,
          "upIds": "23,99",
          "id": 15,
          "username": "atjiu"
        }
      ],
      "total": 3,
      "size": 20,
      "current": 1,
      "searchCount": true,
      "pages": 1
    }
  }
}
7.13. 首页 - 上传文件(图片,视频)
-
地址 POST
/api/upload -
请求类型 application/form-data
-
参数
-
token
-
file: 上传图片的文件对象,支持多个文件, 多个文件就在formData里多次添加
formData.append("file", file); -
type: 上传图片的类型,如果上传头像请填
avatar,如果是发帖上传图片请填topic,如果是视频请填video
-
-
返回 Result(String) // 上传成功后,会返回图片的访问地址
{
  "code": 200,
  "description": "SUCCESS",
  "detail": {
    "errors": [],
    "urls": ["http://localhost:8080/static/upload/avatar/tomoya/avatar.png"]
  }
}
7.14. 话题 - 话题详情
-
地址 GET
/api/topic/:id -
请求类型 application/json
-
参数
-
token: 可不传,传token返回值里会多一个这个话题是否被自己收藏,如果不填就没有这个对象
-
id: 话题id
-
-
返回 Result(Map)
{
"code": 200,
"description": "SUCCESS",
"detail": {
"comments": [
{
"id": 1,
"topicId": 1,
"userId": 1,
"content": "modify_comment_content",
"inTime": 1548992961000,
"commentId": null,
"upIds": "2",
"username": "tomoya",
"avatar": "http://localhost:8080/static/upload/avatar/tomoya/avatar.png",
"layer": 0
},
{
"id": 5,
"topicId": 1,
"userId": 2,
"content": "@tomoya 我是第三条评论",
"inTime": 1548993369000,
"commentId": 1,
"upIds": null,
"username": "test",
"avatar": "http://localhost:8080/static/upload/avatar/test/avatar.png",
"layer": 1
},
{
"id": 4,
"topicId": 1,
"userId": 2,
"content": "我是第二条评论",
"inTime": 1548993303000,
"commentId": null,
"upIds": null,
"username": "test",
"avatar": "http://localhost:8080/static/upload/avatar/test/avatar.png",
"layer": 0
}
],
"topic": {
"id": 1,
"title": "我是一个话题标题",
"content": "我是话题内容\n\n我还支持Markdown语法哦\n\n\n\n- 无序列表1\n- 无序列表2\n- 无序列表3\n\n1. 有序列表1\n2. 有序列表2\n3. 有序列表3\n\n| Column A | Column B | Column C |\n| -------- | -------- | -------- |\n| A1 | B1 | C1 |\n| A2 | B2 | C2 |\n| A3 | B3 | C3 |\n\n[开发俱乐部](https://17dev.club/)",
"inTime": 1548992281000,
"modifyTime": 1548992296000,
"userId": 1,
"commentCount": 4,
"collectCount": 1,
"view": 13,
"top": false,
"good": false,
"upIds": null
},
"topicUser": {
"id": 1,
"username": "tomoya",
"telegramName": null,
"avatar": "http://localhost:8080/static/upload/avatar/tomoya/avatar.png",
"email": null,
"website": null,
"bio": null,
"score": 20,
"inTime": 1548992041000,
"emailNotification": false
},
"collect": {
"topicId": 1,
"userId": 2,
"inTime": 1548999420000
},
"collects": [
{
"topicId": 1,
"userId": 2,
"inTime": 1548999420000
}
],
"tags": [
{
"id": 1,
"name": "一个标签",
"description": "标签描述,解释一下标签让人能更明白它的意思",
"icon": "http://spring.io/img/homepage/icon-spring-boot.svg",
"topicCount": 1,
"inTime": 1548992281000
}
]
}
}7.15. 话题 - 发布话题
-
地址 POST
/api/topic -
请求类型 application/json
-
参数
-
token
-
title: 话题标题
-
content: 话题内容(可为空)
-
-
返回 Result(Topic)
{
    "code": 200,
    "description": "SUCCESS",
    "detail":  {
        "id": 11,
        "title": "222",
        "content": "",
        "inTime": 1551063711700,
        "modifyTime": null,
        "userId": 1,
        "commentCount": 0,
        "collectCount": 0,
        "view": 0,
        "top": false,
        "good": false,
        "upIds": null
    }
}
7.16. 话题 - 编辑话题
-
地址 PUT
/api/topic -
请求类型 application/json
-
参数
-
token
-
id: 话题ID
-
title: 话题标题
-
content: 话题内容(可为空)
-
-
返回 Result(Topic)
{
    "code": 200,
    "description": "SUCCESS",
    "detail": {
        "id": 11,
        "title": "333",
        "content": null,
        "inTime": 1551063712000,
        "modifyTime": 1551064039058,
        "userId": 1,
        "commentCount": 0,
        "collectCount": 0,
        "view": 0,
        "top": false,
        "good": false,
        "upIds": null
    }
}
7.17. 话题 - 删除话题
-
地址 DELETE
/api/topic -
请求类型 application/json
-
参数
-
token
-
id: 话题ID
-
-
返回 Result()
{
  "code": 200,
  "description": "SUCCESS",
  "detail": null
}
7.18. 话题 - 点赞话题
-
地址 GET
/api/topic/:id/vote -
请求类型 application/json
-
参数
-
token
-
id: 话题ID
-
-
返回 Result(int) 返回点赞后当前话题的总赞数
{
  "code": 200,
  "description": "SUCCESS",
  "detail": 1
}
7.19. 评论 - 发布评论
-
地址 POST
/api/comment -
请求类型 application/json
-
参数
-
token
-
content: 评论的内容
-
topicId: 评论的话题ID
-
commentId: 回复评论的对象(盖楼评论的上级评论id)
-
-
返回 Result(Comment)
{
  "code": 200,
  "description": "SUCCESS",
  "detail": {
    "id": 1,
    "topicId": 1,
    "userId": 1,
    "content": "我是一个评论",
    "inTime": 1548992997521,
    "commentId": null,
    "upIds": null
  }
}
7.20. 评论 - 更新评论
-
地址 PUT
/api/comment/:id -
请求类型 application/json
-
参数
-
token
-
id: 评论的id
-
content: 评论的内容
-
-
返回 Result(Comment)
{
  "code": 200,
  "description": "SUCCESS",
  "detail": {
    "id": 1,
    "topicId": 1,
    "userId": 1,
    "content": "我是更新后的评论",
    "inTime": 1548993059477,
    "commentId": null,
    "upIds": null
  }
}
7.21. 评论 - 删除评论
-
地址 DELETE
/api/comment/:id -
请求类型 application/json
-
参数
-
token
-
id: 评论的id
-
-
返回 Result()
{
  "code": 200,
  "description": "SUCCESS",
  "detail": null
}
7.22. 评论 - 点赞评论
-
地址 GET
/api/comment/:id/vote -
请求类型 application/json
-
参数
-
token
-
id: 评论的id
-
-
返回 Result(int) 返回点赞后当前评论的总赞数
{
  "code": 200,
  "description": "SUCCESS",
  "detail": 1
}
7.23. 收藏 - 收藏话题
-
地址 POST
/api/collect/:topicId -
请求类型 application/json
-
参数
-
token
-
topicId: 话题ID
-
-
返回 Result()
{
  "code": 200,
  "description": "SUCCESS",
  "detail": null
}
7.24. 收藏 - 取消收藏
-
地址 DELETE
/api/collect/:topicId -
请求类型 application/json
-
参数
-
token
-
topicId: 话题ID
-
-
返回 Result()
{
  "code": 200,
  "description": "SUCCESS",
  "detail": null
}
7.25. 通知 - 未读消息个数
-
地址 GET
/api/notification/notRead -
请求类型 application/json
-
参数
-
token
-
-
返回 Result(int) // 返回未读消息条数
{
  "code": 200,
  "description": "SUCCESS",
  "detail": 1
}
7.26. 通知 - 标记消息已读
-
地址 GET
/api/notification/markRead -
请求类型 application/json
-
参数
-
token
-
-
返回 Result()
{
  "code": 200,
  "description": "SUCCESS",
  "detail": null
}
7.27. 通知 - 消息列表
-
地址 GET
/api/notification/list -
请求类型 application/json
-
参数
-
token
-
-
返回 Result(Map)
{
  "code": 200,
  "description": "SUCCESS",
  "detail": {
    "read": [
      {
        "inTime": 1548993303000,
        "topicId": 1,
        "read": true,
        "action": "COMMENT",
        "targetUserId": 1,
        "id": 1,
        "avatar": "http://localhost:8080/static/upload/avatar/test/avatar.png",
        "title": "我是一个话题标题",
        "userId": 2,
        "content": "我是第二条评论",
        "username": "test"
      }
    ],
    "notRead": [
      {
        "inTime": 1548993369000,
        "topicId": 1,
        "read": false,
        "action": "REPLY",
        "targetUserId": 1,
        "id": 2,
        "avatar": "http://localhost:8080/static/upload/avatar/test/avatar.png",
        "title": "我是一个话题标题",
        "userId": 2,
        "content": "@tomoya 我是第三条评论",
        "username": "test"
      },
      {
        "inTime": 1548993369000,
        "topicId": 1,
        "read": false,
        "action": "COMMENT",
        "targetUserId": 1,
        "id": 3,
        "avatar": "http://localhost:8080/static/upload/avatar/test/avatar.png",
        "title": "我是一个话题标题",
        "userId": 2,
        "content": "@tomoya 我是第三条评论",
        "username": "test"
      }
    ]
  }
}
7.28. 用户 - 用户信息
-
地址 GET
/api/user/:username -
请求类型 application/json
-
参数
-
username: 用户名
-
-
返回 Result(Map)
-
用户信息
-
话题列表(7条)
-
评论列表(7条)
-
收藏条数
-
{
"code": 200,
"description": "SUCCESS",
"detail": {
"oAuthUsers": [
{
"id": 1,
"oauthId": 6915570,
"type": "GITHUB",
"login": "atjiu",
"inTime": 1548734221000,
"bio": "hello world",
"email": "py2qiuse@gmail.com",
"userId": 1
}
],
"comments": {
"records": [
{
"inTime": 1548992961000,
"topicId": 1,
"commentUsername": "tomoya",
"upIds": "2",
"id": 1,
"topicUsername": "tomoya",
"title": "我是一个话题标题",
"userId": 1,
"content": "modify_comment_content"
}
],
"total": 1,
"size": 10,
"current": 1,
"searchCount": true,
"pages": 1
},
"topics": {
"records": [
{
"collectCount": 2,
"avatar": "http://localhost:8080/static/upload/avatar/tomoya/avatar.png",
"title": "我是一个话题标题",
"userId": 1,
"good": false,
"content": "我是话题内容\n\n我还支持Markdown语法哦\n\n\n\n- 无序列表1\n- 无序列表2\n- 无序列表3\n\n1. 有序列表1\n2. 有序列表2\n3. 有序列表3\n\n| Column A | Column B | Column C |\n| -------- | -------- | -------- |\n| A1 | B1 | C1 |\n| A2 | B2 | C2 |\n| A3 | B3 | C3 |\n\n[开发俱乐部](https://17dev.club/)",
"commentCount": 4,
"inTime": 1548992281000,
"view": 20,
"modifyTime": 1548992296000,
"top": false,
"upIds": "2",
"id": 1,
"username": "tomoya"
}
],
"total": 1,
"size": 10,
"current": 1,
"searchCount": true,
"pages": 1
},
"collectCount": 1,
"user": {
"id": 1,
"username": "tomoya",
"telegramName": null,
"avatar": "http://localhost:8080/static/upload/avatar/tomoya/avatar.png",
"email": "py2qiuse@gmail.com",
"website": "https://17dev.club/",
"bio": "hello world",
"score": 20,
"inTime": 1548992041000,
"emailNotification": false
}
}
}7.29. 用户 - 用户话题列表
-
地址 GET
/api/user/:username/topics -
请求类型 application/json
-
参数
-
username: 用户名
-
pageNo: 页数
-
-
返回 Result(Map)
{
"code": 200,
"description": "SUCCESS",
"detail": {
"topics": {
"records": [
{
"collectCount": 2,
"avatar": "http://localhost:8080/static/upload/avatar/tomoya/avatar.png",
"title": "我是一个话题标题",
"userId": 1,
"good": false,
"content": "我是话题内容\n\n我还支持Markdown语法哦\n\n\n\n- 无序列表1\n- 无序列表2\n- 无序列表3\n\n1. 有序列表1\n2. 有序列表2\n3. 有序列表3\n\n| Column A | Column B | Column C |\n| -------- | -------- | -------- |\n| A1 | B1 | C1 |\n| A2 | B2 | C2 |\n| A3 | B3 | C3 |\n\n[开发俱乐部](https://17dev.club/)",
"commentCount": 4,
"inTime": 1548992281000,
"view": 20,
"modifyTime": 1548992296000,
"top": false,
"upIds": "2",
"id": 1,
"username": "tomoya"
}
],
"total": 1,
"size": 20,
"current": 1,
"searchCount": true,
"pages": 1
},
"user": {
"id": 1,
"username": "tomoya",
"telegramName": null,
"avatar": "http://localhost:8080/static/upload/avatar/tomoya/avatar.png",
"email": "py2qiuse@gmail.com",
"website": "https://17dev.club/",
"bio": "hello world",
"score": 20,
"inTime": 1548992041000,
"emailNotification": false
}
}
}7.30. 用户 - 用户评论列表
-
地址 GET
/api/user/:username/comments -
请求类型 application/json
-
参数
-
username: 用户名
-
pageNo: 页数
-
-
返回 Result(Map)
{
  "code": 200,
  "description": "SUCCESS",
  "detail": {
    "comments": {
      "records": [
        {
          "inTime": 1548992961000,
          "topicId": 1,
          "commentUsername": "tomoya",
          "upIds": "2",
          "id": 1,
          "topicUsername": "tomoya",
          "title": "我是一个话题标题",
          "userId": 1,
          "content": "modify_comment_content"
        }
      ],
      "total": 1,
      "size": 20,
      "current": 1,
      "searchCount": true,
      "pages": 1
    },
    "user": {
      "id": 1,
      "username": "tomoya",
      "telegramName": null,
      "avatar": "http://localhost:8080/static/upload/avatar/tomoya/avatar.png",
      "email": "py2qiuse@gmail.com",
      "website": "https://17dev.club/",
      "bio": "hello world",
      "score": 20,
      "inTime": 1548992041000,
      "emailNotification": false
    }
  }
}
7.31. 用户 - 用户收藏列表
-
地址 GET
/api/user/:username/collects -
请求类型 application/json
-
参数
-
username: 用户名
-
pageNo: 页数
-
-
返回 Result(Map)
{
"code": 200,
"description": "SUCCESS",
"detail": {
"user": {
"id": 1,
"username": "tomoya",
"telegramName": null,
"avatar": "http://localhost:8080/static/upload/avatar/tomoya/avatar.png",
"email": "py2qiuse@gmail.com",
"website": "https://17dev.club/",
"bio": "hello world",
"score": 20,
"inTime": 1548992041000,
"emailNotification": false
},
"collects": {
"records": [
{
"collectCount": 2,
"avatar": "http://localhost:8080/static/upload/avatar/tomoya/avatar.png",
"title": "我是一个话题标题",
"userId": 1,
"good": false,
"content": "我是话题内容\n\n我还支持Markdown语法哦\n\n\n\n- 无序列表1\n- 无序列表2\n- 无序列表3\n\n1. 有序列表1\n2. 有序列表2\n3. 有序列表3\n\n| Column A | Column B | Column C |\n| -------- | -------- | -------- |\n| A1 | B1 | C1 |\n| A2 | B2 | C2 |\n| A3 | B3 | C3 |\n\n[开发俱乐部](https://17dev.club/)",
"commentCount": 4,
"tags": [
{
"id": 1,
"name": "一个标签",
"description": "标签描述,解释一下标签让人能更明白它的意思",
"icon": "http://spring.io/img/homepage/icon-spring-boot.svg",
"topicCount": 1,
"inTime": 1548992281000
}
],
"inTime": 1548992281000,
"view": 20,
"modifyTime": 1548992296000,
"top": false,
"upIds": "2",
"id": 1,
"username": "tomoya"
}
],
"total": 1,
"size": 20,
"current": 1,
"searchCount": true,
"pages": 1
}
}
}7.32. 设置 - 更新个人信息
-
地址 PUT
/api/settings -
请求类型 application/json
-
参数
-
token
-
telegramName: Telegram用户名
-
website: 个人网站
-
bio: 个人简介
-
emailNotification: 是否接收邮箱通知
-
-
返回 Result()
{
  "code": 200,
  "description": "SUCCESS",
  "detail": null
}
7.33. 设置 - 发送激活邮件
-
地址 GET
/api/settings/sendActiveEmail -
请求类型 application/x-www-form-urlencoded
-
参数
-
token
-
-
返回 Result()
{
  "code": 200,
  "description": "SUCCESS",
  "detail": null
}
7.34. 设置 - 发送邮箱验证码
-
地址 GET
/api/sendEmailCode -
请求类型 application/x-www-form-urlencoded
-
参数
-
token
-
email: 邮箱地址
-
-
返回 Result()
{
  "code": 200,
  "description": "SUCCESS",
  "detail": null
}
7.35. 设置 - 更新用户邮箱
-
地址 PUT
/api/settings/updateEmail -
请求类型 application/json
-
参数
-
token
-
email: 邮箱地址
-
-
返回 Result()
{
  "code": 200,
  "description": "SUCCESS",
  "detail": null
}
7.36. 设置 - 修改密码
-
地址 PUT
/api/settings/updatePassword -
请求类型 application/json
-
参数
-
token
-
oldPassword: 旧密码
-
newPassword: 新密码
-
-
返回 Result()
{
  "code": 200,
  "description": "SUCCESS",
  "detail": null
}
7.37. 设置 - 刷新token
-
地址 GET
/api/settings/refreshToken -
请求类型 application/x-www-form-urlencoded
-
参数
-
token
-
-
返回 Result(String) // 返回新token
{
  "code": 200,
  "description": "SUCCESS",
  "detail": "208bb4c1-daf1-4a32-b198-7f4db8f6d565"
}
8. Q&A
8.1. 数据库在哪?
启动项目只需要配置好数据源连接地址,用户名,密码,其它都不用管,如果数据源连接信息都配置的对,启动还是报错,请查看你配置的MySQL用户是否有创建数据库以及表和对表的CRUD的权限
8.2. 发帖技巧
-
default主题的编辑器用的是 codemirror 实现的,可以对代码进行高亮,也可以通过 shift+tab/tab 进行缩进
-
上传图片,上传视频都有相应的链接,点一下就可以了
-
对视频网站的链接解析,目前支持了
youtubebilibiliqqyouku四个网站的视频链接,直接把视频网页的链接拷贝过来贴在编辑器里即可,当渲染详情页的时候服务器会自动解析
8.3. 上传的图片为啥不显示
说明
-
后台配置的静态资源`static`文件夹路径要跟程序启动的jar文件在一个目录内且同级请不要配置在其它地方,如果是用nginx映射的静态资源文件夹则没有这限制
-
windows下的路径要么是
\\要么是/请不要用windows自带的一个\做路径,程序不认,会导致上传失败
首先这是个只会在用IDEA开发启动时出现的问题,原因是IDEA在启动SpringBoot项目的时候会把项目中的 resources 加载到内存里,pybbs中的`static`文件夹在resources里
所以项目启动之后,再上传到`static`文件夹里的文件就不会被idea自动加载了,这时候只需要在idea里build一下项目即可,不用重启
8.4. 上传的视频格式有哪些
因为html标签中的 video 标签默认支持 mp4 格式,所以我在default主题里的上传组件里限制了上传视频文件的类型为 mp4 ,同时对图片的格式也做了限制 png,jpg,gif
8.5. 上传视频报413错误
这是nginx报的错,需要对nginx配置一下 client_max_body_size
location / {
    root   html;
    index  index.html index.htm;
    client_max_body_size    20m; # 限20MB大小
}
不过在程序的后台也有配置大小,那个配置会在controller里做校验,超出的话,会返回一个文件过大的信息
8.6. 后台用户名密码是多少?
快速开始文档里有
8.7. 启动项目时报错
错误信息: java.lang.IllegalStateException: Failed to execute CommandLineRunner
|
这个错误一般是主题文件夹没有找到的错,可以参考一下这篇文章,如果是一样的错就对了 https://17dev.club/article/5c98adb7bbe14024b9e067b3
如果你是按照文档上的`快速开始`来启动的,就不会出现这个问题,开发环境加载的是`resources/templates`下的主题文件夹,正式环境加载的是 ./templates/theme
所以解决这个问题的方法就是区分开你是正式环境还是部署环境启动的
错误信息: No timezone mapping entry for 'GMT 8'
|
这是MySQL时区的问题,只在windows上有问题,我本机测试是把数据源里url链接后面的 &serverTimezone=GMT%2B8 删了就可以了,不过也有用户反馈这种方法不行
那就换成另一种写法 &serverTimezone=Asia/Shanghai 也是可以的
8.8. redis配置失败
redis请不要开启auth,程序内集成的代码没有支持auth的配置
如果你非要支持auth选项,可以自行修改源码,源码类名是 RedisService.java
8.9. 发帖或者评论有emoji时提交失败
错误信息: # Error updating database. Cause: java.sql.SQLException: Incorrect string value: '\xF0\x9F\x98\x82' for column 'content' at row 1
|
mysql默认不支持emoji,要手动配置一下,让它支持就可以了,方法如下
修改mysql的配置文件,ubuntu的配置文件在 /etc/mysql/mysql.conf.d/mysqld.cnf,其它系统的配置文件自己找一下
打开找到 [mysqld] 在下面加上
[mysqld]
character-set-client-handshake = FALSE
character-set-server = utf8mb4
collation-server = utf8mb4_unicode_ci
init_connect='SET NAMES utf8mb4'
加好后保存,然后重启mysql服务
接着把pybbs的表内字段有可能会出现emoji的字段的编码都改成 utf8mb4_unicode_ci 这个类型,再发帖就没问题了
8.10. 标签在哪添加
用户发帖添加标签太乱,我给去掉了,给话题添加标签需要管理员在后台编辑话题处添加标签
8.11. 是否支持富文本编辑器发帖
是的,目前master分支上已经增加了 wangeditor 作为富文本编辑器来发帖评论,可在后台系统设置中选择编辑器风格
-
RICH: 富文本
-
MD: Markdown (默认)