Config是啥?
Config分服务端和客户端,服务端连接一个获取所有配置文件的地址(也可以是本地),客户端连接服务端,在服务启动后,直接可以拿到服务端里的配置信息
坑
首先说一下碰到的坑,网上的教程里没一个提到要引入 spring-cloud-starter-bootstrap 这个依赖的
<dependency>
    <groupId>org.springframework.cloud</groupId>
    <artifactId>spring-cloud-starter-bootstrap</artifactId>
</dependency>
我是照着网上的教程来配置的,服务端没什么问题,连接git也成功了,直接发请求也能拿到配置内容,但当客户端配置好连接服务端后,在客户端里获取配置内容就死活不成功,在我翻遍网上能找到的各种博客后,无果,去spring官网上看了看
找到了客户端的配置方法,其中提到了要引入 spring-cloud-starter-bootstrap 这个依赖,然后我给引入了,启动,请求一气呵成,没问题了。。
官方文档里也提到了要在配置文件里加上一个
spring.cloud.boostrap.enabled=true配置,我在idea里加上了,它提示不能解析,如下图然后我没有配置它,也是可行的

服务端
依赖
<dependency>
    <groupId>org.springframework.cloud</groupId>
    <artifactId>spring-cloud-config-server</artifactId>
</dependency>
启动类 要多加一个注解 @EnableConfigServer
链接原文: https://atjiu.github.io/2021/01/11/spring-cloud-config/
package com.example.springcloudtutorial;

import org.springframework.boot.SpringApplication;
import org.springframework.boot.autoconfigure.SpringBootApplication;
import org.springframework.cloud.config.server.EnableConfigServer;

@SpringBootApplication
@EnableConfigServer  // 就多加了这一个注解
public class ConfigApplication {

    public static void main(String[] args) {
        SpringApplication.run(ConfigApplication.class, args);
    }
}
配置文件
server.port=18085

spring.application.name=config

# config
spring.cloud.config.label=master
spring.cloud.config.server.git.search-paths=spring-cloud-config-test
# 如果这个地址不是公开的,还要配置上用户名和密码
spring.cloud.config.server.git.uri=https://gitee.com/tomoya/spring-cloud-config-test.git
#spring.cloud.config.server.git.username=xx
#spring.cloud.config.server.git.password=xx
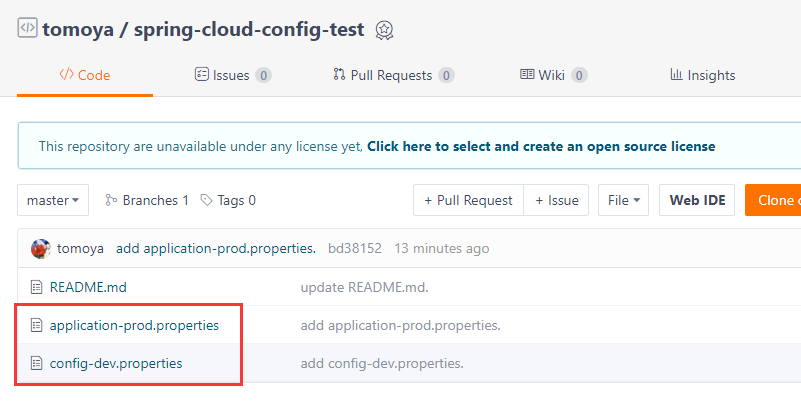
上面这个地址 https://gitee.com/tomoya/spring-cloud-config-test.git 里的文件如下图

config-dev.properties
site.name = hello world dev
application-prod.properties
site.pageSize = 20
命名有一定的讲究
/{application}/{profile}[/{label}]
/{application}-{profile}.yml
/{label}/{application}-{profile}.yml
/{application}-{profile}.properties
/{label}/{application}-{profile}.properties
- label 是git项目的分支名,我是放在master分支下
- application 一般是模块名(也可以随便取,只要开发能记住)比如user模块要用的配置,这就可以写成user
- profile 是环境名,一般有开发环境dev,测试环境test,正式环境prod
application这个命名也被坑到,吐槽一下网上各别博客是真就不测试直接就写来坑人,居然有的博客上写这个application的名字一定要跟config的服务端的
spring.application.name一样,没这说法!!!
启动服务端,发送请求测试 http://localhost:18085/master/config-dev.properties
返回的信息就是 config-dev.properties 的文件内容
客户端
依赖
<dependency>
    <groupId>org.springframework.boot</groupId>
    <artifactId>spring-boot-starter-web</artifactId>
</dependency>
<dependency>
    <groupId>org.springframework.cloud</groupId>
    <artifactId>spring-cloud-starter-config</artifactId>
</dependency>
<dependency>
    <groupId>org.springframework.cloud</groupId>
    <artifactId>spring-cloud-starter-bootstrap</artifactId>
</dependency>
启动类
package com.example.springcloudtutorial;

import org.springframework.beans.factory.annotation.Value;
import org.springframework.boot.SpringApplication;
import org.springframework.boot.autoconfigure.SpringBootApplication;
import org.springframework.web.bind.annotation.GetMapping;
import org.springframework.web.bind.annotation.RestController;

@SpringBootApplication
@RestController

public class ConfigClientApplication {

    @Value("${site.name:}") // 这个配置是在config-dev.properties里
    private String siteName;
    @Value("${site.pageSize:}") // 这个配置是在application-prod.properties里
    private Integer pageSize;

    @GetMapping("/getConfig")
    public Object getConfig() {
        return "getConfig: " + siteName + ", pageSize:" + pageSize;
    }

    public static void main(String[] args) {
        SpringApplication.run(ConfigClientApplication.class, args);
    }
}
链接文原: https://atjiu.github.io/2021/01/11/spring-cloud-config/
配置文件: 配置文件要配置两个,一个是 application.properties 一个是 bootstrap.properties
bootstrap.properties是系统级的,优先级要高于 application.properties,但,如果只用一个bootstrap.properties配置文件启动能成功,但配置的服务端口不会生效,所以还是要两个
bootstrap.properties里配置 config 的内容
spring.cloud.config.label=master
spring.cloud.config.name=application
spring.cloud.config.profile=prod
spring.cloud.config.uri=http://localhost:18085
application.properties里配置项目的内容
server.port=18086
spring.application.name=config-client
# 这行配置貌似没有,但官方文档里有
#spring.cloud.boostrap.enabled=true
启动客户端,访问:http://localhost:18086/getConfig 就能拿到对应配置文件里的内容了
Eureka服务发现配置
上面的实现方式是通过url来直连的,config也支持通过注册中心的服务发现来共享配置
服务端添加依赖
<dependency>
    <groupId>org.springframework.cloud</groupId>
    <artifactId>spring-cloud-starter-netflix-eureka-client</artifactId>
</dependency>
配置文件 application.properties
spring.application.name=config

eureka.instance.instance-id=config-${server.port}
eureka.client.service-url.defaultZone=http://localhost:18080/eureka/
客户端添加依赖
<dependency>
    <groupId>org.springframework.cloud</groupId>
    <artifactId>spring-cloud-starter-netflix-eureka-client</artifactId>
</dependency>
配置文件修改 bootstrap.properties
spring.cloud.config.label=master
spring.cloud.config.name=config
spring.cloud.config.profile=dev
# 注释掉这个通过url直连的
#spring.cloud.config.uri=http://localhost:18085

# 开启服务发现支持
spring.cloud.config.discovery.enabled=true
# service-id默认值是 configserver 这个值取自 config服务端的 spring.application.name
spring.cloud.config.discovery.service-id=config

# 注册中心
eureka.instance.instance-id=config-client-${server.port}
eureka.client.service-url.defaultZone=http://localhost:18080/eureka/
最后别忘了在服务端和客户端的启动类上添加上@EnableEurekaClient注解
启动服务测试,同样是可以拿到config服务端里的配置