这篇来学习让用户信息及用户的权限信息从数据库里查出来进行认证校验
- 数据库:MySQL
- 操作数据库框架:MyBatis-Plus
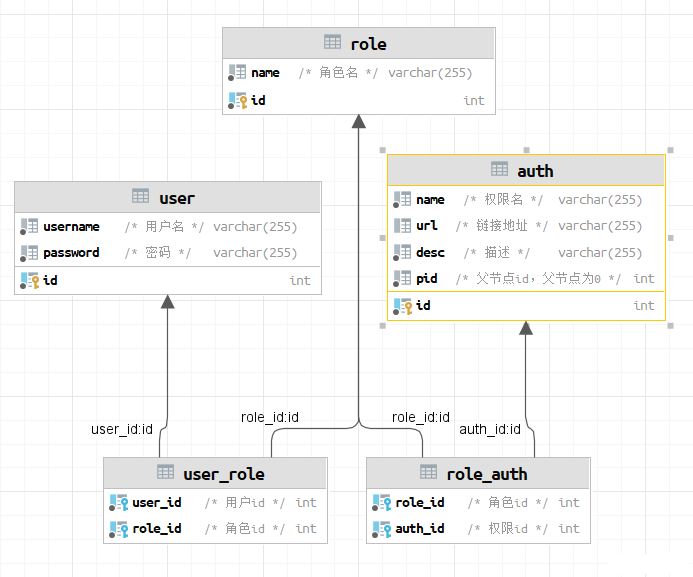
表模型
共有如下5张表
- 用户表:user
- 角色表:role
- 权限表:auth
- 用户角色关联表:user_role
- 角色权限关联表:role_auth
其中用户与角色为多对多关系(其实也可以设计成一对多),角色与权限也为多对多关系
表SQL
CREATE TABLE `user` (
  `id` int NOT NULL AUTO_INCREMENT,
  `username` varchar(255) COLLATE utf8mb4_general_ci NOT NULL COMMENT '用户名',
  `password` varchar(255) COLLATE utf8mb4_general_ci NOT NULL COMMENT '密码',
  PRIMARY KEY (`id`)
) ENGINE=InnoDB AUTO_INCREMENT=3 DEFAULT CHARSET=utf8mb4 COLLATE=utf8mb4_general_ci;
CREATE TABLE `role` (
  `id` int NOT NULL AUTO_INCREMENT,
  `name` varchar(255) COLLATE utf8mb4_general_ci NOT NULL COMMENT '角色名',
  PRIMARY KEY (`id`)
) ENGINE=InnoDB AUTO_INCREMENT=3 DEFAULT CHARSET=utf8mb4 COLLATE=utf8mb4_general_ci;
CREATE TABLE `auth` (
  `id` int NOT NULL AUTO_INCREMENT,
  `name` varchar(255) CHARACTER SET utf8mb4 COLLATE utf8mb4_general_ci NOT NULL COMMENT '权限名',
  `url` varchar(255) CHARACTER SET utf8mb4 COLLATE utf8mb4_general_ci DEFAULT NULL COMMENT '链接地址',
  `desc` varchar(255) CHARACTER SET utf8mb4 COLLATE utf8mb4_general_ci NOT NULL COMMENT '描述',
  `pid` int NOT NULL DEFAULT '0' COMMENT '父节点id,父节点为0',
  PRIMARY KEY (`id`)
) ENGINE=InnoDB AUTO_INCREMENT=12 DEFAULT CHARSET=utf8mb4 COLLATE=utf8mb4_general_ci;
CREATE TABLE `user_role` (
  `user_id` int NOT NULL COMMENT '用户id',
  `role_id` int NOT NULL COMMENT '角色id',
  KEY `user_id` (`user_id`),
  KEY `role_id` (`role_id`),
  CONSTRAINT `user_role_ibfk_1` FOREIGN KEY (`user_id`) REFERENCES `user` (`id`),
  CONSTRAINT `user_role_ibfk_2` FOREIGN KEY (`role_id`) REFERENCES `role` (`id`)
) ENGINE=InnoDB DEFAULT CHARSET=utf8mb4 COLLATE=utf8mb4_general_ci;
CREATE TABLE `role_auth` (
  `role_id` int NOT NULL COMMENT '角色id',
  `auth_id` int NOT NULL COMMENT '权限id',
  KEY `role_id` (`role_id`),
  KEY `auth_id` (`auth_id`),
  CONSTRAINT `role_auth_ibfk_1` FOREIGN KEY (`role_id`) REFERENCES `role` (`id`),
  CONSTRAINT `role_auth_ibfk_2` FOREIGN KEY (`auth_id`) REFERENCES `auth` (`id`)
) ENGINE=InnoDB DEFAULT CHARSET=utf8mb4 COLLATE=utf8mb4_general_ci;
初始化数据
用户表
INSERT INTO `springsecurity-demo`.`user` (`id`, `username`, `password`) VALUES (1, 'admin', '{bcrypt}$2a$10$yf9B.etIpjgmNoE.i3gL1ObpV9RPVkkBGpCnRkd.luyeuwMcdHrcm');
INSERT INTO `springsecurity-demo`.`user` (`id`, `username`, `password`) VALUES (2, 'zhangsan', '{bcrypt}$2a$10$VnoJ9QCcetGXtZpd42sgNeVfvYpa5bKj0nSVXWkfjukFgIyQobrAy');
角色表
INSERT INTO `springsecurity-demo`.`role` (`id`, `name`) VALUES (1, '管理员');
INSERT INTO `springsecurity-demo`.`role` (`id`, `name`) VALUES (2, '审核员');
权限表
INSERT INTO `springsecurity-demo`.`auth` (`id`, `name`, `url`, `desc`, `pid`) VALUES (1, 'user', NULL, '用户模块', 0);
INSERT INTO `springsecurity-demo`.`auth` (`id`, `name`, `url`, `desc`, `pid`) VALUES (2, 'user:list', '/user/list', '用户列表', 1);
INSERT INTO `springsecurity-demo`.`auth` (`id`, `name`, `url`, `desc`, `pid`) VALUES (3, 'user:add', '/user/add', '用户添加', 1);
INSERT INTO `springsecurity-demo`.`auth` (`id`, `name`, `url`, `desc`, `pid`) VALUES (4, 'user:edit', '/user/edit', '用户编辑', 1);
INSERT INTO `springsecurity-demo`.`auth` (`id`, `name`, `url`, `desc`, `pid`) VALUES (5, 'user:delete', '/user/delete', '用户删除', 1);
INSERT INTO `springsecurity-demo`.`auth` (`id`, `name`, `url`, `desc`, `pid`) VALUES (6, 'index', NULL, '首页', 0);
用户角色关联表
INSERT INTO `springsecurity-demo`.`user_role` (`user_id`, `role_id`) VALUES (1, 1);
INSERT INTO `springsecurity-demo`.`user_role` (`user_id`, `role_id`) VALUES (2, 2);
角色权限关联表
INSERT INTO `springsecurity-demo`.`role_auth` (`role_id`, `auth_id`) VALUES (1, 1);
INSERT INTO `springsecurity-demo`.`role_auth` (`role_id`, `auth_id`) VALUES (1, 2);
INSERT INTO `springsecurity-demo`.`role_auth` (`role_id`, `auth_id`) VALUES (1, 3);
INSERT INTO `springsecurity-demo`.`role_auth` (`role_id`, `auth_id`) VALUES (1, 4);
INSERT INTO `springsecurity-demo`.`role_auth` (`role_id`, `auth_id`) VALUES (1, 5);
INSERT INTO `springsecurity-demo`.`role_auth` (`role_id`, `auth_id`) VALUES (1, 6);
INSERT INTO `springsecurity-demo`.`role_auth` (`role_id`, `auth_id`) VALUES (2, 6);
INSERT INTO `springsecurity-demo`.`role_auth` (`role_id`, `auth_id`) VALUES (2, 2);
反向生成
可以借助idea的easycode插件,将这些表反向生成为kotlin代码和mybatis的xml文件,此处省略。
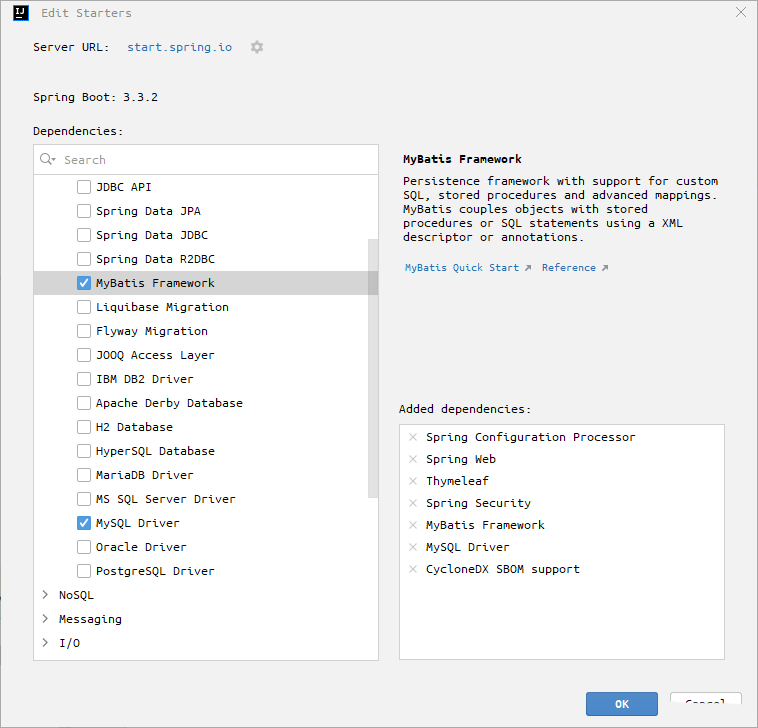
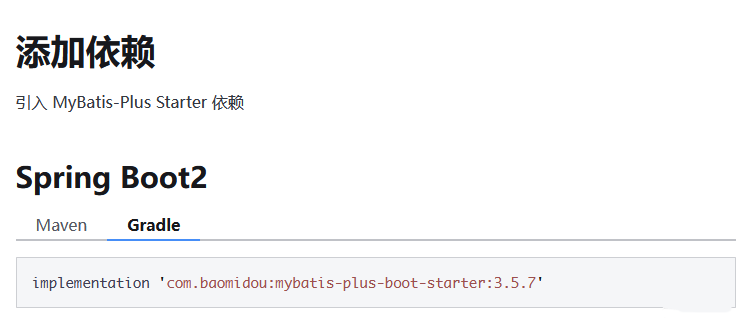
引入依赖
将MySQL和MyBatis-Plus相关依赖引入到项目中
如果IDEA有这个功能,可以直接点击进行添加,没有的话就往下翻,直接拷贝代码吧
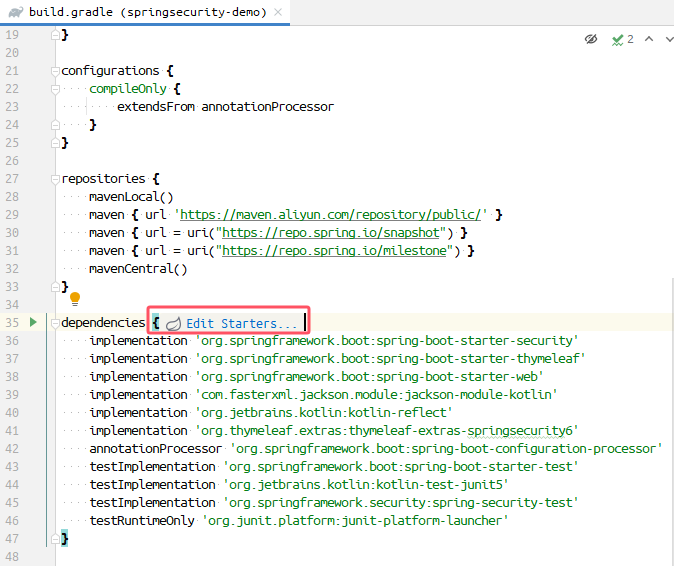
将MySQL的依赖添加进来,MyBatis-Plus需要去官网找一下 注意,这里还需要将MyBatis的依赖添加进来,否则会有个莫名其妙的报错(Invalid value type for attribute ‘factoryBeanObjectType’: java.lang.String)
将这段代码拷贝到项目中
dependencies {
    implementation 'org.springframework.boot:spring-boot-starter-security'
    implementation 'org.springframework.boot:spring-boot-starter-thymeleaf'
    implementation 'org.springframework.boot:spring-boot-starter-web'
    implementation 'com.fasterxml.jackson.module:jackson-module-kotlin'
    implementation 'org.jetbrains.kotlin:kotlin-reflect'
    implementation 'org.thymeleaf.extras:thymeleaf-extras-springsecurity6'
    implementation 'org.mybatis.spring.boot:mybatis-spring-boot-starter:3.0.3'
    testImplementation 'org.mybatis.spring.boot:mybatis-spring-boot-starter-test:3.0.3'

    runtimeOnly 'com.mysql:mysql-connector-j'
    implementation 'com.baomidou:mybatis-plus-boot-starter:3.5.7'

    annotationProcessor 'org.springframework.boot:spring-boot-configuration-processor'
    testImplementation 'org.springframework.boot:spring-boot-starter-test'
    testImplementation 'org.jetbrains.kotlin:kotlin-test-junit5'
    testImplementation 'org.springframework.security:spring-security-test'
    testRuntimeOnly 'org.junit.platform:junit-platform-launcher'
}
配置文件
spring.application.name = springsecurity-demo

# 连接数据库
spring.datasource.driver-class-name                     = com.mysql.cj.jdbc.Driver
spring.datasource.url                                   = jdbc:mysql://localhost:3306/springsecurity-demo?useUnicode=true&characterEncoding=UTF-8&serverTimezone=Asia/Shanghai
spring.datasource.username                              = root
spring.datasource.password                              = 123123

# MyBatis-Plus 配置
mybatis-plus.mapper-locations                           = classpath*:mapper/**/*.xml
mybatis-plus.type-aliases-package                       = com.example.springsecuritydemo.model
mybatis-plus.global-config.db-config.id-type            = auto
mybatis-plus.global-config.banner                       = false
mybatis-plus.configuration.map-underscore-to-camel-case = true
查询准备
注意:上面设计表的时候权限表里有个字段desc是sql中的关键字,需要在生成的字段上添加注解@TableField(“`desc`”),否则查询时会报错
代码生成好之后,需要提供几个service,功能是根据用户名查询用户信息及权限信息
UserService.kt
package com.example.springsecuritydemo.service;

import com.baomidou.mybatisplus.extension.kotlin.KtQueryWrapper
import com.baomidou.mybatisplus.extension.service.impl.ServiceImpl
import com.example.springsecuritydemo.mapper.UserMapper
import com.example.springsecuritydemo.model.User
import org.springframework.stereotype.Service
import org.springframework.util.StringUtils

@Service
class UserService : ServiceImpl<UserMapper, User>() {

    fun getByUsername(username: String): User? {
        if (!StringUtils.hasText(username)) return null

        val wrapper = KtQueryWrapper(User::class.java)
        wrapper.eq(User::username, username)

        val list = super.list(wrapper)
        if (list.isEmpty()) return null

        return list[0]
    }
}
UserRoleService.kt
package com.example.springsecuritydemo.service;

import com.baomidou.mybatisplus.extension.kotlin.KtQueryWrapper
import com.baomidou.mybatisplus.extension.service.impl.ServiceImpl
import com.example.springsecuritydemo.mapper.UserRoleMapper
import com.example.springsecuritydemo.model.UserRole
import org.springframework.stereotype.Service

@Service
class UserRoleService : ServiceImpl<UserRoleMapper, UserRole>() {

    fun getByUserId(userId: Int?): List<UserRole> {
        val wrapper = KtQueryWrapper(UserRole::class.java)
        wrapper.eq(UserRole::userId, userId)
        return super.list(wrapper)
    }
}
AuthMapper.kt
package com.example.springsecuritydemo.mapper;

import com.baomidou.mybatisplus.core.mapper.BaseMapper
import com.example.springsecuritydemo.model.Auth
import org.apache.ibatis.annotations.Param
import org.apache.ibatis.annotations.Select

interface AuthMapper : BaseMapper<Auth> {

    @Select("select a.* from auth a, role_auth ra where ra.auth_id = a.id and ra.role_id in (#{roleIds})")
    fun getByRoleIds(@Param("roleIds") roleIds: String): List<Auth>?
}
AuthService.kt
package com.example.springsecuritydemo.service;

import com.baomidou.mybatisplus.extension.service.impl.ServiceImpl
import com.example.springsecuritydemo.mapper.AuthMapper
import com.example.springsecuritydemo.model.Auth
import org.springframework.stereotype.Service

@Service
class AuthService : ServiceImpl<AuthMapper, Auth>() {

    fun getByRoleIds(roleIds: String): List<Auth>? {
        return baseMapper.getByRoleIds(roleIds)
    }
}
MyUserDetailsService
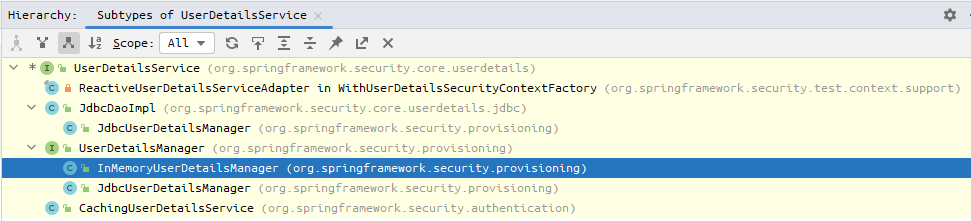
前面用的是内存中用户,也就是 InMemoryUserDetailsManager 这个类。可以看到这个类也是UserDetailsService接口的其中一个实现类
下面来写我们自己的实现 MyUserDetailsService.kt
package com.example.springsecuritydemo.security

import com.example.springsecuritydemo.service.AuthService
import com.example.springsecuritydemo.service.UserRoleService
import com.example.springsecuritydemo.service.UserService
import org.springframework.security.core.authority.SimpleGrantedAuthority
import org.springframework.security.core.userdetails.User
import org.springframework.security.core.userdetails.UserDetails
import org.springframework.security.core.userdetails.UserDetailsService
import org.springframework.security.core.userdetails.UsernameNotFoundException
import org.springframework.stereotype.Service

@Service
class MyUserDetailsService(
    private val userService: UserService,
    private val userRoleService: UserRoleService,
    private val authService: AuthService
) : UserDetailsService {

    /**
     * 实现接口,查询用户信息和权限信息。
     *
     * @param username 登录的用户名
     * @return 封装成 org.springframework.security.core.userdetails.UserDetails 对象返回
     */
    override fun loadUserByUsername(username: String?): UserDetails? {
        if (username == null) throw UsernameNotFoundException(username)

        val user = userService.getByUsername(username)
        if (user == null) throw UsernameNotFoundException(username)

        // 查询权限
        val userRoles = userRoleService.getByUserId(user.id)
        var roleIds: String = ""
        userRoles.forEach { roleIds = "${roleIds},${it.roleId}" }
        val auths = authService.getByRoleIds(roleIds.substring(1, roleIds.length))

        val authorities: MutableList<SimpleGrantedAuthority> = mutableListOf()
        if (auths!!.isNotEmpty()) {
            auths.forEach { authorities.addLast(SimpleGrantedAuthority(it.name)) }

            return User(username, user.password, authorities)
        }
        throw UsernameNotFoundException(username)
    }
}
SecurityConfig
接着来修改 SecurityConfig
通过构造方法将 MyUserDetailsService 注入进来
@Configuration
@EnableWebSecurity
class SecurityConfig(private val myUserDetailsService: MyUserDetailsService) {}
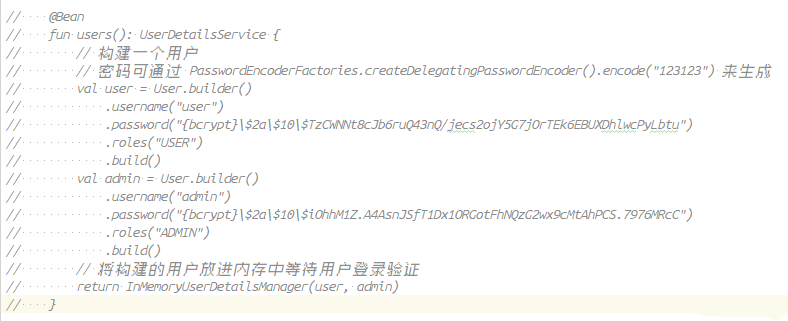
将模拟用户这个bean注释掉
将 authenticationManager() 里的用到的 UserDetailsService 换成自己的
/**
 * 构建登录认证管理器,将userDetailService与passwordEncoder联系起来
 */
@Bean
open fun authenticationManager(): AuthenticationManager {
    val authenticationProvider = DaoAuthenticationProvider()
    authenticationProvider.setUserDetailsService(myUserDetailsService)
    authenticationProvider.setPasswordEncoder(PasswordEncoderFactories.createDelegatingPasswordEncoder())

    return ProviderManager(authenticationProvider)
}
测试
使用用户 zhangsan 登录
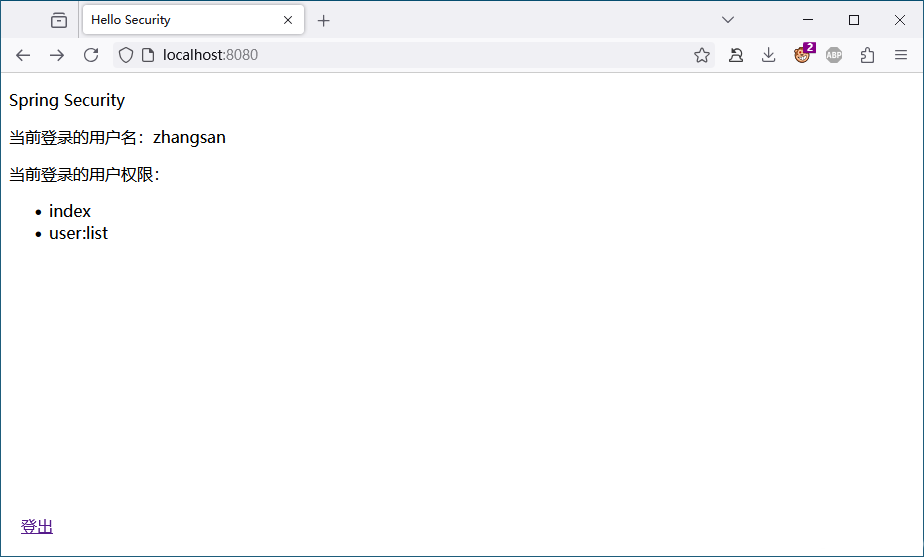
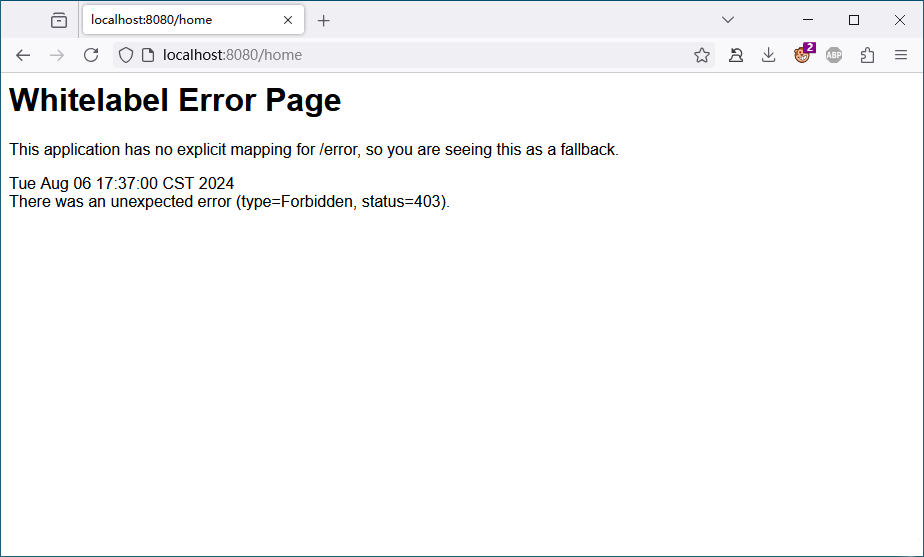
zhangsan是没有user:delete权限的。将/home 地址所需权限修改成 user:delete
http {
   authorizeRequests {
        // 配置 /home 路径需要 user:delete 权限
        authorize("/home", hasAuthority("user:delete"))
        // 配置所有请求地址都需要登录认证才能访问
        authorize("/**", authenticated)
    }
...
重启服务使用zhangsan再次登录并打开 /home 地址可以看到是没有权限的
总结
- 本篇将用户的登录校验从硬编码换成了从数据库中读取
- 代码改动比较大,不过主要是表生成为kotlin类相关的,真正涉及到
SecurityConfig.kt类的修改很少 - 本文操作数据库用的是mybatis-plus,这并不是唯一选择,只要能查出来数据就都行