上一篇介绍了传统的不同服务之间调用的用法,这一篇使用eureka搭建一个最简单的分布式的微服务项目
eureka 不推荐使用了
既然使用了eureka,那么注册中心自然就是eureka了
场景:两个订单服务,都提供了创建订单的方法,一个用户服务,一个注册中心服务。
要求:用户服务调用订单服务创建订单
版本号
- spring-book 2.2.2.RELEASE
- spring-cloud Hoxton.SR9
创建注册中心服务
依赖
<dependencies>
    <dependency>
        <groupId>org.springframework.boot</groupId>
        <artifactId>spring-boot-starter-web</artifactId>
    </dependency>
    <dependency>
        <groupId>org.springframework.cloud</groupId>
        <artifactId>spring-cloud-starter-netflix-eureka-server</artifactId>
    </dependency>
</dependencies>
配置文件
server.port=18080

spring.application.name=eureka-server

eureka.instance.instance-id=eureka-server-${server.port}
eureka.instance.hostname=localhost

eureka.client.fetch-registry=false
eureka.client.register-with-eureka=false
启动类
package com.example.springcloudtutorial;

import org.springframework.boot.SpringApplication;
import org.springframework.boot.autoconfigure.SpringBootApplication;
import org.springframework.cloud.netflix.eureka.server.EnableEurekaServer;

@SpringBootApplication
@EnableEurekaServer
public class EurekaServer {

    public static void main(String[] args) {
        SpringApplication.run(EurekaServer.class, args);
    }
}
链文接原: https://atjiu.github.io/2021/01/01/spring-cloud-eureka-server/
创建Order服务
依赖
<dependency>
    <groupId>org.springframework.boot</groupId>
    <artifactId>spring-boot-starter-web</artifactId>
</dependency>
<dependency>
    <groupId>org.springframework.cloud</groupId>
    <artifactId>spring-cloud-starter-netflix-eureka-client</artifactId>
</dependency>
配置
server.port=18082

# 实例名字多个服务保持一致
spring.application.name=order

eureka.instance.instance-id=order-${server.port}
# 注册中心地址
eureka.client.service-url.defaultZone=http://localhost:18080/eureka/

# 在注册中心显示服务的ip地址
eureka.instance.prefer-ip-address=true
启动类及提供的接口
package com.example.springcloudtutorial;

import org.springframework.boot.SpringApplication;
import org.springframework.boot.autoconfigure.SpringBootApplication;
import org.springframework.cloud.netflix.eureka.EnableEurekaClient;
import org.springframework.web.bind.annotation.GetMapping;
import org.springframework.web.bind.annotation.RestController;

@SpringBootApplication
@EnableEurekaClient
@RestController
public class Order1Application {

    @GetMapping("/order/create")
    public Object create(String userId) {
        return "userId: " + userId + " create an order! server: order1";  // 最后通过 server: order1 来区分user最终调用的是哪个服务
    }

    public static void main(String[] args) {
        SpringApplication.run(Order1Application.class, args);
    }
}
同样的配置,改一下端口为 18083
创建User服务
依赖
<dependency>
    <groupId>org.springframework.boot</groupId>
    <artifactId>spring-boot-starter-web</artifactId>
</dependency>
<dependency>
    <groupId>org.springframework.cloud</groupId>
    <artifactId>spring-cloud-starter-netflix-eureka-client</artifactId>
</dependency>
配置
接链文原: https://atjiu.github.io/2021/01/01/spring-cloud-eureka-server/
server.port=18081

spring.application.name=user

eureka.instance.instance-id=user-${server.port}
eureka.client.service-url.defaultZone=http://localhost:18080/eureka/
调用及启动类
package com.example.springcloudtutorial;

import org.springframework.boot.SpringApplication;
import org.springframework.boot.autoconfigure.SpringBootApplication;
import org.springframework.cloud.client.discovery.EnableDiscoveryClient;
import org.springframework.cloud.client.loadbalancer.LoadBalanced;
import org.springframework.cloud.netflix.eureka.EnableEurekaClient;
import org.springframework.context.annotation.Bean;
import org.springframework.http.ResponseEntity;
import org.springframework.web.bind.annotation.GetMapping;
import org.springframework.web.bind.annotation.RestController;
import org.springframework.web.client.RestTemplate;

@SpringBootApplication
@EnableEurekaClient
@EnableDiscoveryClient  // 调用其它实例服务的时候要加上这个注解,意思是到注册中心去找提供服务的实例
@RestController
public class UserApplication {

    // 这里还没有用到第三方的服务调用,就手写resttemplate请求来发起调用
    @Bean
    @LoadBalanced  // 必须要加上这个注解,实现多个服务之间的负载均衡
    public RestTemplate restTemplate() {
        return new RestTemplate();
    }

    // 浏览器中要调用的接口
    @GetMapping("/createOrder")
    public Object createOrder(String userId) {
        // 使用 http://ORDER 来发起请求,ORDER 就是在 order服务里配置的 eureka.instance.appname=order 多个order服务,这个名字一定要一样
        ResponseEntity<String> forEntity = restTemplate().getForEntity("http://ORDER/order/create?userId=" + userId, String.class);
        return forEntity.getBody();
    }

    public static void main(String[] args) {
        SpringApplication.run(UserApplication.class, args);
    }
}
启动服务测试
依次启动:eureka-server, order1, order2, user
启动成功后,访问 http://localhost:18080 会看到下面界面 其中ORDER实例有两个服务

然后访问 http://localhost:18081/createOrder?userId=123
会得到下面结果(多刷新几次会发现 server: order2/order1)
userId: 123 create an order! server: order2
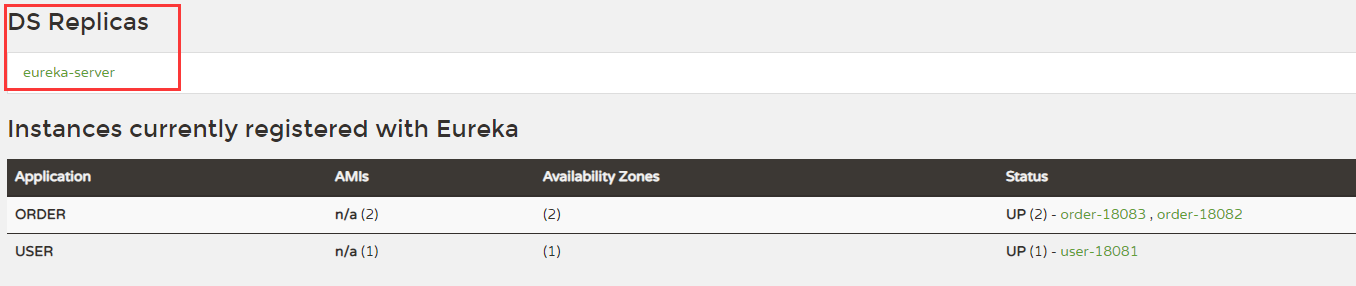
DS Replicas:我的理解就是数据备份(同步),不见得正确,仅供参考 DS:database Replicas:备份
为什么需要它:实例服务如果只有一个的话,会不安全,万一服务挂掉了,没有可替代的服务接管被调用,所以需要多份实例。那么注册中心也是一样的,如果只有一个注册中心,当这个注册中心挂了,整个微服务就完了,如果有多个注册中心的话,一个挂掉了,还可以使用另一个,它们之间的数据也可以互相的同步,这对整个微服务架构就会相对的安全的多
接原链文: https://atjiu.github.io/2021/01/01/spring-cloud-eureka-server/
具体配置方法如下
同样的eureka-server再复制一份,修改端口号为 28080
18080端口的配置文件修改如下
server.port=18080

spring.application.name=eureka-server

eureka.instance.appname=eureka-server
eureka.instance.hostname=eureka-server

eureka.client.fetch-registry=false
eureka.client.register-with-eureka=false
eureka.client.service-url.defaultZone=http://eureka-server1:28080/eureka/
28080端口的配置文件修改如下
server.port=28080

spring.application.name=eureka-server

eureka.instance.instance-id=eureka-server-${server.port}
eureka.instance.hostname=eureka-server1

eureka.client.fetch-registry=false
eureka.client.register-with-eureka=false
eureka.client.service-url.defaultZone=http://eureka-server:18080/eureka/
然后修改系统的hosts文件,添加下面两行配置
127.0.0.1 eureka-server
127.0.0.1 eureka-server1
重启 eureka-server 和 eureka-server1
访问 http://localhost:18080/ DS Replicas 标签下显示如下图
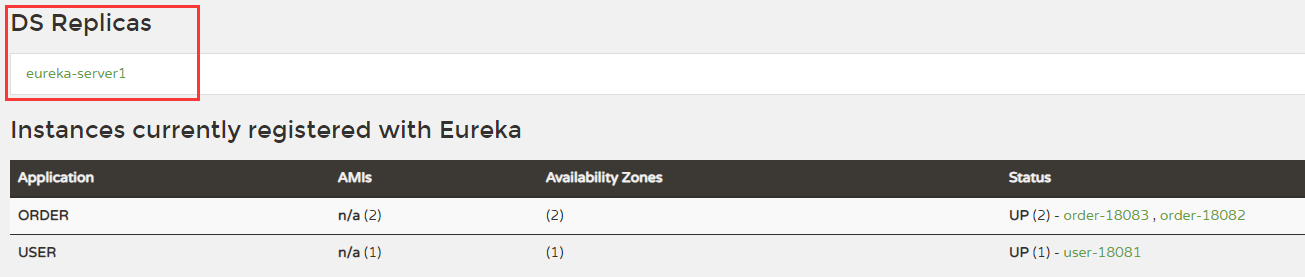
访问 http://localhost:28080/ DS Replicas 标签下显示如下图