公司要做微信公众号,又折腾了一遍,总结一下,备忘用
申请测试帐号
个人申请的公众号没有认证的话,是没有那么多权限的,不过微信给我们提供了一个申请测试帐号的页面,申请的测试帐号基本上有所有的权限,申请地址:https://mp.weixin.qq.com/debug/cgi-bin/sandboxinfo?action=showinfo&t=sandbox/index
扫码登录一下,微信就会分配一个测试帐号
接入自己的服务器
官方文档地址:https://developers.weixin.qq.com/doc/offiaccount/Basic_Information/Access_Overview.html
我这用springboot启动了一个web服务,提供了一个接口,访问地址为 http://localhost:8080/wechat/,请求类型为GET,根据文档中介绍,微信来验证的时候会传四个参数 signature timestamp nonce echostr
我自己服务器里这个接口拿到这四个参数后,要使用token、timestamp、nonce这三个参数进行校验,成功的话,将参数echostr返回就可以接入成功了
文档中给出的是php的校验方法,我在网上找了一个java的校验类
import java.security.MessageDigest;
import java.security.NoSuchAlgorithmException;

/**
 * 请求校验工具类
 */
public class SignUtil {

    public static boolean checkSignature(String token, String signature, String timestamp, String nonce) {
        //从请求中(也就是微信服务器传过来的)拿到的token, timestamp, nonce
        String[] arr = new String[]{token, timestamp, nonce};
        // 将token、timestamp、nonce三个参数进行字典序排序
        sort(arr);
        StringBuilder content = new StringBuilder();
        for (int i = 0; i < arr.length; i++) {
            content.append(arr[i]);
        }
        MessageDigest md = null;
        String tmpStr = null;

        try {
            md = MessageDigest.getInstance("SHA-1");
            // 将三个参数字符串拼接成一个字符串进行sha1加密
            byte[] digest = md.digest(content.toString().getBytes());
            //将字节数组转成字符串
            tmpStr = byteToStr(digest);
        } catch (NoSuchAlgorithmException e) {
            e.printStackTrace();
        }

        content = null;
        // 将sha1加密后的字符串可与signature对比,标识该请求来源于微信
        return tmpStr != null && tmpStr.equals(signature.toUpperCase());
    }

    //将加密后的字节数组变成字符串
    private static String byteToStr(byte[] byteArray) {
        String strDigest = "";
        for (int i = 0; i < byteArray.length; i++) {
            strDigest += byteToHexStr(byteArray[i]);
        }
        return strDigest;
    }

    private static String byteToHexStr(byte mByte) {
        char[] Digit = {'0', '1', '2', '3', '4', '5', '6', '7', '8', '9', 'A',
                'B', 'C', 'D', 'E', 'F'};
        char[] tempArr = new char[2];
        tempArr[0] = Digit[(mByte >>> 4) & 0X0F];
        tempArr[1] = Digit[mByte & 0X0F];

        String s = new String(tempArr);
        return s;
    }

    //用于字典排序
    public static void sort(String a[]) {
        for (int i = 0; i < a.length - 1; i++) {
            for (int j = i + 1; j < a.length; j++) {
                if (a[j].compareTo(a[i]) < 0) {
                    String temp = a[i];
                    a[i] = a[j];
                    a[j] = temp;
                }
            }
        }
    }
}
接口如下
@GetMapping("/")
public Object callback(String signature, String timestamp, String nonce, String echostr) {
    log.info("signature: {}, timestamp: {}, nonce: {}, echostr: {}", signature, timestamp, nonce, echostr);
    if (SignUtil.checkSignature(siteConfig.getWechat().getToken(), signature, timestamp, nonce)) {
        return ResponseEntity.ok(echostr);
    } else {
        return ResponseEntity.noContent();
    }
}
用户页面授权
公众号文档中的接口很多都要用户的openid,所以有必要在一开始就能拿到用户的openid,这样就可以给用户发消息,模板消息等
页面授权官方文档:https://developers.weixin.qq.com/doc/offiaccount/OA_Web_Apps/Wechat_webpage_authorization.html
就是一套OAuth2协议的授权,这个不多说
文接链原: https://atjiu.github.io/2019/12/19/wechat-mp/
用户授权拿到的数据除了openid外,还有access_token,这个token跟公众号的token是不一样的,这个token的作用是拿来调用用户的一些数据的,比如用户的基本信息
另外还有一个接口 https://developers.weixin.qq.com/doc/offiaccount/Basic_Information/Get_access_token.html 拿的是公众号的token,这个token的作用是调用公众号的一些接口的,比如给用户发送消息等
注意
如果是测试帐号的话,调用页面授权还要在测试帐号页面上配置一下域名,这个配置的地方有点不太容易发现,位置如下图,把上面接入的个人的服务域名写上就可以了

发送模板消息
官方文档:https://developers.weixin.qq.com/doc/offiaccount/Message_Management/Template_Message_Interface.html
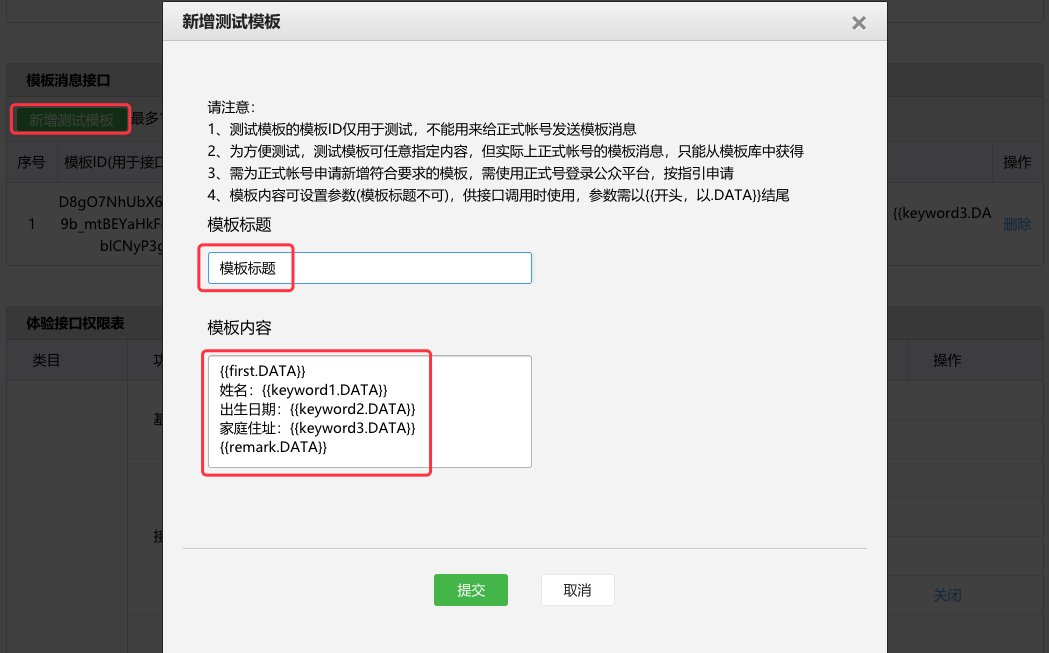
首先要先创建模板消息,如下图

其中 {{}} 里的内容是固定写法,keyword可以不止3个,可以更多,也可以更少
对应发送接口的数据长下面这个样
{
    "touser":"OPENID",
    "template_id":"ngqIpbwh8bUfcSsECmogfXcV14J0tQlEpBO27izEYtY",
    "url":"http://weixin.qq.com/download",
    "data":{
            "first": {
                "value":"恭喜你购买成功!",
                "color":"#173177"
            },
            "keyword1":{
                "value":"巧克力",
                "color":"#173177"
            },
            "keyword2": {
                "value":"39.8元",
                "color":"#173177"
            },
            "keyword3": {
                "value":"2014年9月22日",
                "color":"#173177"
            },
            "remark":{
                "value":"欢迎再次购买!",
                "color":"#173177"
            }
    }
}
公众号token获取
公众号token最长有效期是2个小时,用于调用公众号的一些接口,一般简单点用个定时器来定时更新即可,不过也可以将token存在一个变量里,每次获取的时候,判断一下token是否过期,过期的话,重新请求更新token,下面是我封装的一个工具,交给spring管理
@Component
@Slf4j
public class WeChatUtil {

    private Date expireTime;
    private String accessToken;

    @Autowired
    private RestTemplate restTemplate;
    @Autowired
    private SiteConfig siteConfig;

    public String getAccessToken() {
        if (accessToken == null || DateUtil.isExpire(expireTime)) {
            this.accessToken = null;
            this.fetchAssessToken();
            return accessToken;
        }
        return accessToken;
    }

    private void fetchAssessToken() {
        try {
            String appID = siteConfig.getWechat().getAppID();
            String appsecret = siteConfig.getWechat().getAppsecret();
            String url = "https://api.weixin.qq.com/cgi-bin/token?grant_type=client_credential&appid=" + appID + "&secret=" + appsecret;
            ResponseEntity<String> forEntity = restTemplate.getForEntity(url, String.class);
            Map body = JSON.parseObject(forEntity.getBody(), Map.class);
            String access_token = (String) body.get("access_token");
            log.info("时间: {}, accessToken: {}", DateUtil.formatDateTime(new Date(), DateUtil.FORMAT_DATETIME), access_token);
            this.expireTime = DateUtil.getHourAfter(new Date(), 1);
            this.accessToken = access_token;
        } catch (RestClientException e) {
            e.printStackTrace();
            log.error("时间:{},获取accessToken失败!!", DateUtil.formatDateTime(new Date(), DateUtil.FORMAT_DATETIME));
        }
    }
}
用到的工具类
/**
* 判断传入的时间是否在当前时间之后,返回boolean值
* true: 过期
* false: 还没过期
*
* @param date
* @return
*/
public static boolean isExpire(Date date) {
    if (date.before(new Date())) return true;
    return false;
}
总结
有了上面这些就可以做一个 Server酱 了!